Setting up connectivity to target test systems

The steps in the Install Guide for installing the Test Management Framework include loading the PegaCESvcs RuleSet into the target systems for which you want to manage the testing using TMF. The rule and data instances in this RuleSet support connectivity and communication between a target test system and TMF.
To complete the linkages that establish connectivity between TMF, the target system, and the specific applications on that system whose behavior you want to test, perform the steps in this article. The linkages are:
- Add the PegaCESvcs RuleSet to the Component and Shared RuleSets array in the application rule forms.
- Create access groups for those testing applications.
- Update the PegaCESvcsIntegrator service package with the name of an access group that corresponds to one of the applications with the PegaCESvcs RuleSet.
Step 1: Create testing applications in the target system and add the PegaCESvcs RuleSet to the application definitions
For each application in the target system that you want to test using TMF, it is a good practice to create a "testing application" that is built on that application, and create an associated RuleSet for storing unit test case rules. Having a separate application rule and RuleSet gives you the flexibility to manage automated unit test cases independently from your primary application's rules and use those unit test cases with TMF.
In the following steps, the phrase "primary application" refers to the application whose behavior you want to test with TMF and the phrase "testing application" is an application built on that primary application.
a. Create a RuleSet to store the primary application's automated unit test case rules
For target systems on V6.1 SP1:
- In the Rules Explorer, expand the SysAdmin category. Then right-click RuleSet and select New from the context menu.
- Enter a name and tab to the next field. The system provides default values for the version and description.
- In the Requires RuleSet and Versionssection, replace the system default with the name of the primary application's RuleSet and version.
For example, if your primary application's RuleSet and version is OrderEntrySystem:02-03, replace the pre-filled Pega-ProcessCommander value with OrderEntrySystem:02-03.
(Do not choose to update your current application with this new RuleSet.)
- Click Create. Then, in the RuleSet form, save the new rule.
For target systems on pre-V6.1 versions:
- In the Rules Explorer, expand the SysAdmin category. Then right-click RuleSet and select New from the context menu.
- Enter a name and click Create. Click the Save icon to save the RuleSet.
- In the Rules Explorer, expand the SysAdmin category. Then right-click RuleSet Version and select New from the context menu.
- Select the name of the RuleSet you just created and enter a version number. Click Create.
- In the Requires RuleSet and Versionssection, enter the name of the primary application's RuleSet and version.
For example, if your primary application's RuleSet and version is OrderEntrySystem:02-03, enter OrderEntrySystem:02-03.
- Click the Save icon to save the new version.
b. Create a new application rule in the target system that is built on your primary application
- In the Rules Explorer, expand the Application Definition category. Then right-click Application and select New from the context menu.
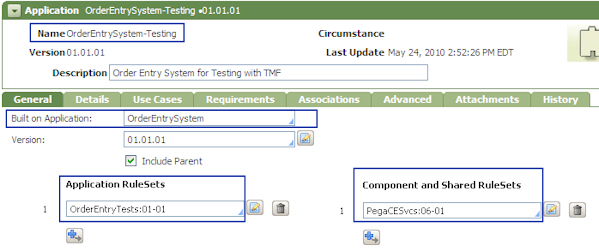
- Enter a name and version for this testing application. For example, if your primary application is named OrderEntrySystem, create a new application named OrderEntrySystem-Testing. Click Create.
- Enter the built-on application and RuleSet information on the General tab (for V6.1 and V5.5 systems) or on the Definitiontab (for 5.4 systems):
- In the Built on Application field, select the primary application.
- Check the Include Parent check box.
- Add the RuleSet that you created for holding unit test cases to the Application RuleSets array.
- Save the rule.
(For more information about testing applications on V6.1 systems, see Creating a testing application and RuleSet for test cases and unit test suites (V6).)
c. Add the PegaCESvcs RuleSet to the Component and Shared RuleSets array of the testing application's rule form
- On the General tab (for V6.1 and V5.5 systems) or on the Definition tab (for 5.4 systems) of the testing application's rule form, specify one of the following in the Component and Shared RuleSetsarray:
- For V6.1 SP1 systems, select PegaCESvcs:06-01
- For V5.5 SP1 systems, select PegaCESvcs:05-05
- For V5.4 SP2 and V5.4 SP3 systems, select PegaCESvcs:05-04
- Save the testing application's rule form.
Repeat these steps for other applications on the target system that you want to test using TMF.
Related V6.1 help topic: About Application rules
Step 2: Create access groups to the testing applications
In the target system, give access to each testing application to those operators that you want running automated unit test cases on rules in that application. TMF can run scenarios that use a testing application's automated unit test cases if the associated operators have the appropriate access.
Note: For V6.1 systems, use the standard PegaRULES:AutoTest access role that comes with Process Commander. For V5.5 and V5.4, use the standard CESvcs:AutoTest access role that was added to the test system during the TMF installation process.
To give access to a testing application:
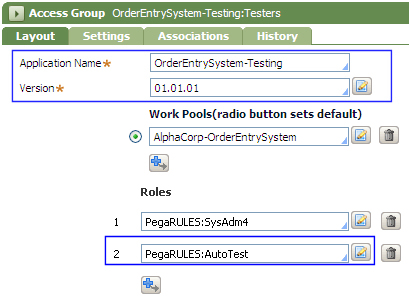
- Create an access group. Enter a name that is related to the testing application. For example, if the testing application is named OrderEntrySystem-Testing, the access group name could be OrderEntrySystem-Testing:Testers.
- In the Access Group rule form, select the testing application and version.
- In the Roles list, select the PegaRULES:AutoTest role (for V6.1 systems) or select the CESvcs:AutoTest role (for pre-V6.1 systems).
- Save the rule.
- Update the appropriate operator IDs with the new access group.
V6.1 Access Group rule form:
Note: If you use the SmartPrompt to add the role and do not see the PegaRULES:AutoTest or CESvcs:AutoTest roles listed, save the access group role with the updated Application field and log out of the system. Log in again, open the access group form, and add the role.
Repeat the steps to give access to the other testing applications.
Related V6.1 online help topic: About Access Group data instances
Step 3: Update the service package's access group
During installation of TMF, a service package named PegaCESvcsIntegrator was added to the test system. This service package needs to use an access group that can see the PegaCESvcs RuleSet (via the access group's application setting). Once you have added the PegaCESvcs RuleSet as a component RuleSet to the testing applications on the system, use one of the access groups that correspond to one of those applications.
- Identify an access group that corresponds to one of the testing applications from Step 1 above.
- In the Class Explorer, select Data > Admin > ServicePackage.
- From the list of service packages, select PegaCESvcsIntegrator.
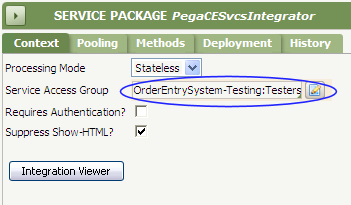
- On the Context tab, in the Service Access Groupfield, select an access group that corresponds to one of the testing applications from Step 1.
For example, select an access group to which you added the CESvcs:AutoTest role in Step 2 and gave to the operator IDs to access a testing application.
- Save the rule.
(Because the Requires Authentication? box is not selected, the system displays a warning that the services in this service package will not authenticate. This is expected behavior.)
Related V6.1 online help topic:About Service Package data instances
Next steps
After the completion of Step 4, this test system can be added to TMF as a test system environment. Continue with TMF - Configuring the framework.