Mass adjustments - adjust, reprocess, void/cancel
The Mass adjustments
screen allows you to search by mass adjustment ID using the auto complete feature.
You may also search for all mass adjustment instances associated to a single claim
by entering an ICN in the claim field. 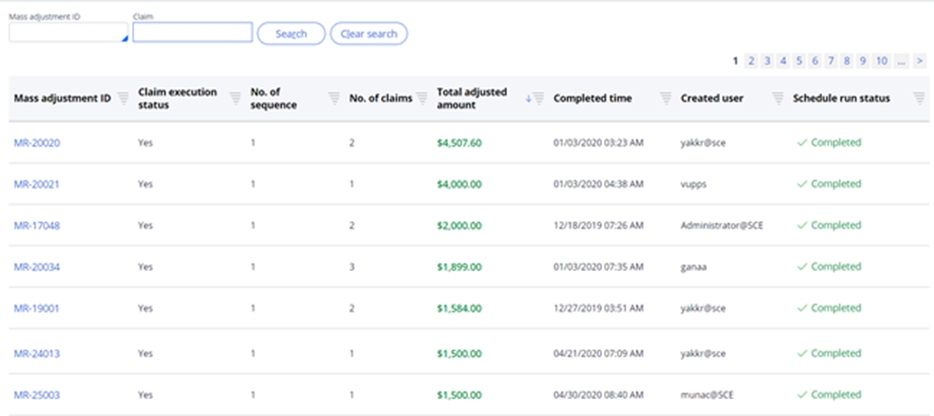
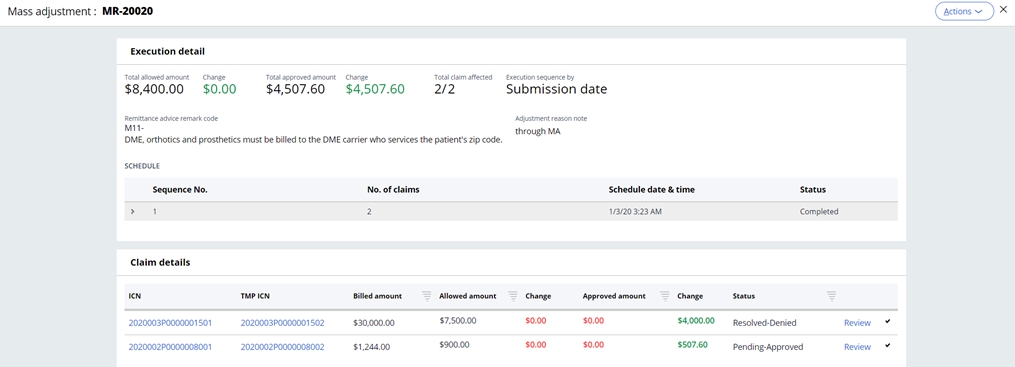
From the search results, you can click on the
Mass adjustment ID hyperlink to open and view the details of the mass adjustment.
To create a new mass adjustment cycle, click Create mass adjustment. The Search claims screen opens.
Search and select claimsTo begin, select Adjustment, Reprocess, or Void/Cancel from the Type of adjustment dropdown on the left panel.
The choice of Adjustment, Reprocess, or Void/Cancel impacts the search results. Choosing Adjustment will automatically filter search results to return only those claims whose status allows them to be adjusted (Pending-Approved or any Resolved status). Choosing Reprocess returns claim that are NOT finalized. Choosing Void/cancel returns claims of any status, as any claim may be voided or cancelled.
Enter one or more search criteria to locate the claims for the mass adjustment. You can also click “Show more fields” to display additional search criteria.
Available criteria are:
| Search criteria | Description |
| Subscriber ID | Begin entering the subscriber name or ID. SCE will display possible matches as they are identified. |
| Patient | Begin entering the patient name or ID. SCE will display possible matches as they are identified. |
| Billing provider tax ID | Begin entering the provider name, internal ID, or tax identification number. SCE will display possible matches as they are identified. |
| Plan ID | Begin entering the Plan ID or name. SCE will display possible matches as they are identified. |
| Claim type | Choose a claim type or All from the dropdown. |
| Claim status | Use the + Add claim status link to select one or more claim statuses to include in the search. Note:The statuses displayed are appropriate based on your choice in the Type of adjustment dropdown; they will vary based on this choice. |
| Event code | Use the + Add event code link to include claims which have raised one of the specified event codes; the system looks for claims with any of the event codes you specify. |
| Group ID | Begin entering the Group ID. SCE will display possible matches as they are identified. |
| Contract ID | Begin entering the Contract ID. SCE will display possible matches as they are identified. |
| Check number | Enter the check number associated with a paid claim or claims. |
| Process from | Enter or use the date picker to select a Process from date. This date represents the most recent processing date for the claim. |
| Process to | Enter or use the date picker to select a Process from date. This date represents the most recent processing date for the claim. |
| Service from | Enter or use the date picker to select a Service from date. |
| Service to | Enter or use the date picker to select a Service to date. |
| Claim identifier | Select the desired claim identifier(s) using the checkbox. |
| Ignore claims in other cycles (checkbox) | Select this checkbox if the search should not return claims that are already part of another active mass adjustment cycle. |
Enter your search criteria and click Search. A list of claims matching the criteria you entered is displayed.
You can configure the search result columns that are displayed and order those columns from left to right. Access this option by selecting the gear icon at the top right of the search results.
From the list of search results, you can use the global checkbox on the header row to select all the claims or you can select the claims to include in the mass adjustment by selecting the checkbox next to each claim. Selecting a claim from the search results opens the claim in a popup window for review.
Once claims have been selected, click Initiate mass adjustment.
Execute claimsThe Execute claims screen provides the Execution sequence by dropdown, where you can choose to sequence the mass adjustment claims by submission date or service from date. A running total of the number of claims selected is displayed. If you want to remove any claims from the mass adjustment cycle, use the trash can icon at the end of each row. You also have the ability to add more claims to the mass adjustment by selecting + Add more claims at the top right of the slot.
Choosing Run claim preview will create temporary versions of each claim and display the change in the total allowed amount (for all claims) and the total approved amount (for all claims) on the Review execution screen. If you select Run claim preview, you can enter an email address so you can be informed when the preview run is completed.
Note: if you do not choose Run claim preview, the Review execution step is not displayed.
At any point during the creation of the mass adjustment, you can choose not to move further by clicking Discard at the top of the screen.
Review executionOnce the claims are selected and the claim preview (if
selected) completes, the Review execution screen displays the change in the
total allowed amount (for all claims) and the total approved amount (for all claims)
claim fields that were changed due to reprocessing. 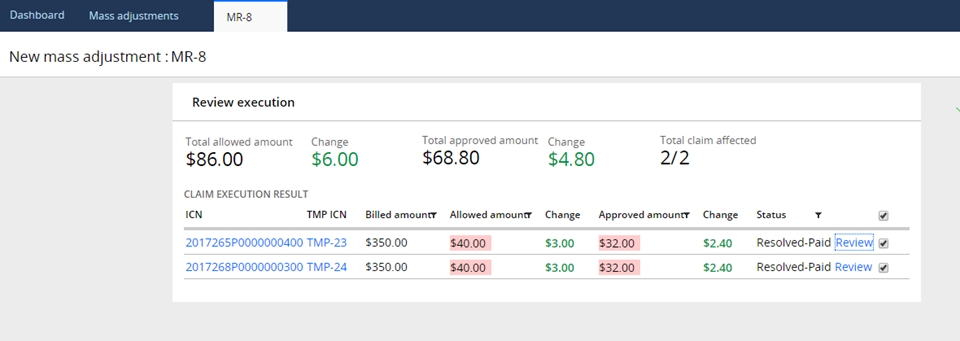
You can click the Review link to analyze the claim before and after adjustment. The system generates a temporary claim (designated by TMP-), which is a preview of the actual adjusted or reprocessed claim. Changes can be reviewed by comparing the temporary and original claims.
To continue, click Next.
Schedule runIn this step, you choose the number of sequences (that is, you may break the mass adjustment into smaller groups of claims), apply a remittance advice code and enter an adjustment reason note.
Setting the number of sequences breaks the claims into smaller groups; enter the number of sequences desired and click Apply. The claims are evenly distributed based on the number of execution sequences selected. Each selected claim is automatically assigned a sequence ID, which you can change.
Use the date picker to schedule the date and time for each sequence to be executed.
To continue, click Next.
Review and submitIn this final step, you can review the claims selected for the mass adjustment cycle. You can reselect or change the claims or update the schedule and reason notes by clicking the appropriate Modify button.
Submit the claims for adjustment by selecting Submit adjustment.
You will then be presented
with a summary of the schedule. You can see the status of the mass adjustment by
searching for the mass adjustment ID on the dashboard. 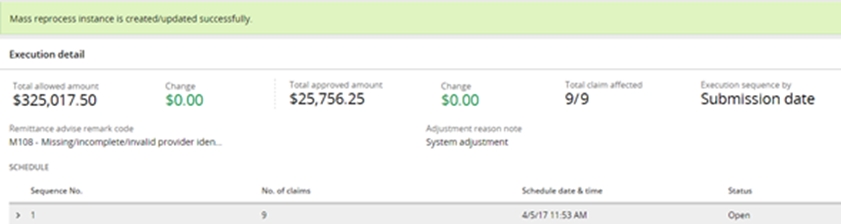
Once the claims are reprocessed, the adjustment
status changes to Resolved-Completed and you can open the status report from
the dashboard. Until that time, the dashboard has a link to review the mass
adjustment and the run status is Scheduled. 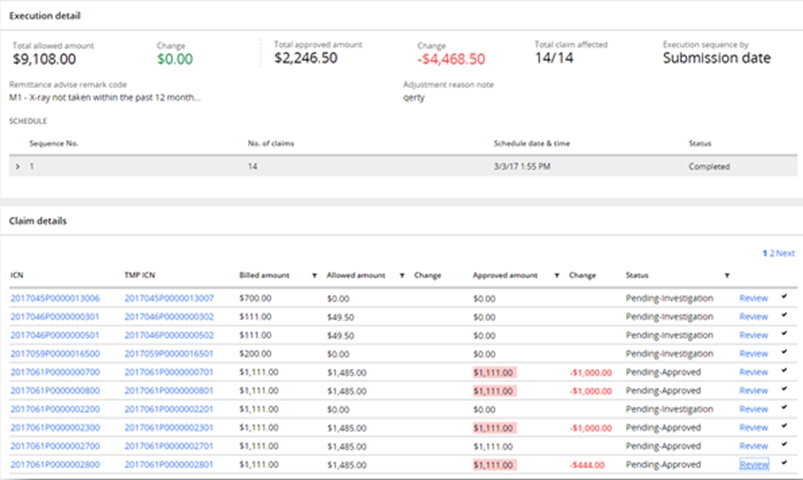
Previous topic Manual claim adjustments Next topic Notifications