
Automatically remove all inline styles
Valid from Pega Version 7.1.5
To ensure reusability and ease of maintenance, you can remove inline styles from all sections in all unlocked ruleset versions in your application from thelanding page. In the Sections Using Inline Styles section, click the Remove inline styles from all sections button.
Support for inline helper text for editable form fields
Valid from Pega Version 8.1
You can now configure inline helper text for editable form fields. The helper text is always visible on the form, and you can style the text to override the helper-text CSS class in the Override CSS file in the skin.
Providing helper text in editable form fields helps users complete forms more quickly and efficiently.
For more information, see Adding a Text Input control.
Personalized table views
Valid from Pega Version 8.1
You can now configure tables so that users can personalize table views at run time. Users can specify which columns to display, resize and reorder columns, and set an initial sort order and initial column filter. When users save these personalized settings, the table displays the personalized view each time that users access the table.
Personalizing table views can help users work more efficiently by providing greater control over what data they see and how it is presented.
For more information, see Configuring a table for personalization.
Improved view authoring
Valid from Pega Version 8.5
Case authoring in Cosmos React UI now features updated view authoring tools. The redesigned view tab and overlay provide a more intuitive interface for creating views, applying design templates, and adding fields and controls. This enhanced work environment improves the user experience and reduces context switching, which contributes to a lower development effort.
For more information, see Editing views in a case type.
Personalized views in table layouts
Valid from Pega Version 8.4
Table layouts now provide users with the option to save preferred run-time configurations, such as column visibility and filtering, as permanent profiles. This enhancement helps users create dedicated views for specific work scenarios, which reduces the need for repetitive adjustments to the user interface and improves productivity.
For more information, see Enabling table personalization.
Upgrade impact
After an upgrade to 8.4 and later, the default table toolbar styling and experience may be unexpectedly different for any customized tables in a client's application: if you enabled a tool bar action for a personalizable table and the 8.4 application overrides your customization, your application now displays the default 8.4 table toolbar.
What steps are required to update the application to be compatible with this change?
Existing clients that upgrade to Pega Platform 8.4 and later may need to update applications in some scenarios. Any custom actions present in the overridden section may need to be re-authored into this toolbar using the additional actions section.
Default views for cases and data objects
Valid from Pega Version 8.5
Pega Platform™ now generates default views for new case types and data objects. Because of this feature, your application now automatically creates a case summary and case details view for every new case type, and a list view for each data object. The default views automate a common recurring task, and improve productivity by reducing development effort.
Revamped view authoring in Cosmos React
Valid from Pega Version 8.6
Applications that use Cosmos React now feature updated case and portal authoring tools, including more templates, improved view editing, and more intuitive management of UI components.
This change empowers citizen developers to build applications through configuration as opposed to customization, and reduces development time while also providing a prescriptive environment for creating optimal customer experience.
For more information, see Configuring forms and views.
Attach Content control
Valid from Pega Version 7.1.5
The Attach Content control assists with attaching and uploading media files for Pega 7 applications. When in a mobile web browser, this control is limited to attaching image files only. Using a desktop browser with this control enabled launches the file browser, allowing users to select a type of capture mechanism and/or utilize an "attach file(s)" file selection prompt directly from their desktop.
View agent activity and status more efficiently
Valid from Pega Version 7.1.7
The menu has been updated with several additional tabs detailing system information pertinent to an active server node running on a system, along with its requestors, log utilities, and purge/archive utilities. The link to the System Management Application tool has also been moved to the menu in this release.
Previously, to understand your system, you had to access every node on your system individually. With this update, the information available on these tabs allows you to view all agents across a cluster to determine if an agent is active and in-depth details about the agent in a more efficient manner.
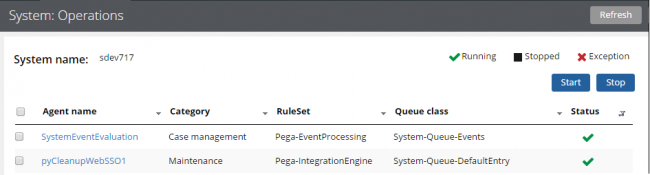
The System: Operations page displays agent information and status on a system
Access this menu by selecting . For more information, see the System Operations landing page.
Updates to the Attach Content control
Valid from Pega Version 7.1.7
Several updates have been made to the Attach Content (pxAttachContent) control, resulting in a faster and more efficient file attachment process. New features include:
- Responsive UI that allows the control attachment screen to conform to various UI sizes across any device accessing the application
- A bigger drop-zone for adding files
- The option to simultaneously add multiple files when using either the file browser or drag-and-drop functionality
- The ability to display the control as either a button, link, or as an icon within an application
- Built-in camera integration on mobile devices, which supports the selection of image files directly from a mobile device’s camera roll
- Safeguards that halt the attachment process upon cancelling an attach action
For more information, see PDN article: How to use the Attach Content control.
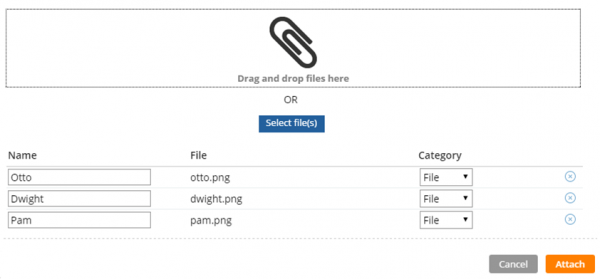
Drag and drop or add multiple files at once