|
|
The tab presents a real-time preview of a portion of the work object form, allowing you to adjust the contents, position, style, and other aspects of the elements in the form quickly. REVISED FOR SP2. UNDO FEATURE GRP-1053-1 deferred to post-6.2 release
C-1778Use the controls at the top of this tab and drag and drop operations to review or update this flow action rule and associated section rules.
![]() You cannot use this tab to modify flow
action rules with the Reference HTML checkbox
checked (on the HTML
tab). These are marked
You cannot use this tab to modify flow
action rules with the Reference HTML checkbox
checked (on the HTML
tab). These are marked Not Auto-Generated on this
tab. HG - Auto-generated HTML? option no longer existsGRP-288 TASK-18332
![]() When you save this rule form, Process
Commander also saves any section rules that the harness rule
references (excluding read-only section rules), and validates all
saved rules.
When you save this rule form, Process
Commander also saves any section rules that the harness rule
references (excluding read-only section rules), and validates all
saved rules.
 As a best
practice, build your application skin (using the Branding
wizard) before you develop flow action rules, especially if you are
using SmartLayouts (with spacing determined by the skin styles.) The
system renders the Layout tab using the
styles of the skin rule identified in the Skins field
of the Run Process In group of your
General preferences. If the Skins
field is blank, these displays use the styles marked
Work on the Styles tab of
the skin identified in your current portal rule. See Designer Studio —
Setting your preferences. 5.5 GRP-503
As a best
practice, build your application skin (using the Branding
wizard) before you develop flow action rules, especially if you are
using SmartLayouts (with spacing determined by the skin styles.) The
system renders the Layout tab using the
styles of the skin rule identified in the Skins field
of the Run Process In group of your
General preferences. If the Skins
field is blank, these displays use the styles marked
Work on the Styles tab of
the skin identified in your current portal rule. See Designer Studio —
Setting your preferences. 5.5 GRP-503
![]() Using the Flow Action form to review or
update a flow action rule causes a clipboard page to be created and
properties to be initialized, which may in turn cause declarative
processing to be executed. Use caution before implementing any
on-change declarative processing that produces database updates.
F-174 APAP SR-866 GROVS 10/11/05
Using the Flow Action form to review or
update a flow action rule causes a clipboard page to be created and
properties to be initialized, which may in turn cause declarative
processing to be executed. Use caution before implementing any
on-change declarative processing that produces database updates.
F-174 APAP SR-866 GROVS 10/11/05
![]() Identifying
controls on this tab
Identifying
controls on this tab
The preview area of this tab holds an approximate visual presentation of the runtime appearance of the flow action:
Click the ![]() button to present
the SmartFrames wireframe preview. Blue wireframe rectangles
help you understand the structure of the section, names of rules
referenced in this rule, and the size and other relationships of
elements in the section.
button to present
the SmartFrames wireframe preview. Blue wireframe rectangles
help you understand the structure of the section, names of rules
referenced in this rule, and the size and other relationships of
elements in the section.
Click the ![]() button to hide
wireframes, providing a less busy and higher fidelity preview.
These buttons do not affect the contents of the rule, only the
display on this tab.
button to hide
wireframes, providing a less busy and higher fidelity preview.
These buttons do not affect the contents of the rule, only the
display on this tab.
These controls operate on a table structure. Select one or more cells first, then click the control to apply the operation described. When a control is not available (grayed), it cannot be applied to the current selection.
Control |
Description |
|
|
Insert a new row before (above) the selected row. |
|
|
Insert a new row after (below) the selected row. |
|
|
Delete the selected row. |
|
|
Insert a new column before (to the left of) the selected column. |
|
|
Insert a new column after (to the right of) the selected column. |
|
|
Delete the selected column. |
|
|
Merge the selected cells (in a single row) to one cell. |
|
|
Merge down, combine thing selected cell and the cell below it. Proj-649 5.4 |
|
|
Unmerge — Undo the immediately previous merge. |
|
|
Delete the contents of a single cell (not a row or column). |
You can also alter the table structure by selecting a row, cell, or column and right-clicking to access a context menu. Select a menu operation: Cut, Copy, Paste, Insert Row, Delete Row, or Delete Column.
![]() Structure of a
flow action rule GRP-288 TASK-18332GATZH
Structure of a
flow action rule GRP-288 TASK-18332GATZH
![]() Flow Actions reference section rules GRP-288 TASK-18332GATZH
Flow Actions reference section rules GRP-288 TASK-18332GATZH
6.1 updated PASHM 10/21/10 All V6.1+ flow actions reference one or more sections. When you create a new flow action, the hint appears in the Layout tab. You can drag an existing section from the Application Explorer or create a new section.
Within a referenced section, you can convert a layout to a section rule. Click the Save As Section icon ( ) next to the magnifying glass in the wireframe's layout header, which displays a New section dialog. Enter a Purpose key value and save the section to your work class.
![]() The formats in pre-V6.1 flow actions were configured with layouts rather than sections. You cannot edit these layouts until you upgrade the flow actions. See More about Flow Action rules.
The formats in pre-V6.1 flow actions were configured with layouts rather than sections. You cannot edit these layouts until you upgrade the flow actions. See More about Flow Action rules.
![]() Prototyping a
flow action before the properties are defined
Prototyping a
flow action before the properties are defined
 You can rapidly mock up the layout, labels,
and controls on this tab before all properties it ultimately will
reference are defined. The development effort you make in designing the
layout is not wasted, as the resulting section rule is a valid
starting point for further evolution after the property rules are
created.
You can rapidly mock up the layout, labels,
and controls on this tab before all properties it ultimately will
reference are defined. The development effort you make in designing the
layout is not wasted, as the resulting section rule is a valid
starting point for further evolution after the property rules are
created.
When you first drop a control dragged from the Basic Group, the control references a standard placeholder property, for example @baseclass.pyTemplateInputBox. You can save and preview the Section form (although these properties are not part of your application).
To produce a flow action rule with the appropriate layout, drag and drop the controls and adjust the labels, but do not complete the Cell Properties panels. Reopen the Flow Action form and update each Cell Properties panel later, when the real properties are defined.
See the Pega Developer Network articles:
![]() Working with
the Cell Properties panel and other panels
Working with
the Cell Properties panel and other panels
Each control is defined by your inputs in floating panel, which you
can pin for faster input. To open the panel, select the control you have placed in the section and click the magnifying glass (![]() ) icon that
appears. Use these controls on the header of floating panel:
) icon that
appears. Use these controls on the header of floating panel:
![]() Layout Group:
Layout Group: ![]() Adding a section, layout, or
repeating layout
Adding a section, layout, or
repeating layout
Click the down arrow (![]() ) in the Container
control group (
) in the Container
control group (![]() and select
a control: PROJ-649 5.4
and select
a control: PROJ-649 5.4
Control |
Description |
|
|
Add a section rule into this flow action. See Adding a section. |
|
|
Add a layout to this flow action — a <TABLE> element containing one or more rows and one or more columns. You can then change the number and size of rows and columns, and set up the contents of each cell (a <TD> HTML element). See: |
The Container, Panel Set, and Accordion controls are not available for flow actions.
![]() Basic Group:
Basic Group: ![]() Placing a property or label in
a cell
Placing a property or label in
a cell
A cell can hold a label or property value or a form field that accepts a user-entered property value. The property value uses a control rule to present the value in read-only or read-write mode.
Click the down arrow (![]() ) in the Basic
control group (
) in the Basic
control group (![]() ) and select a
control:
) and select a
control:
Control |
Description |
|
|
Add a static read-only text label into a cell. Adding a label. |
| Add a Text Input, which corresponds to .pxTextInput control rule. Adding a Text Input control. | |
| Add a TextArea, which can contain more than one line of text. Corresponds to the .pxTextArea control rule. Adding a Text Area control. | |
| |
Add an icon to the form, in a cell or on a header. When clicked at runtime, the icon starts an action. Corresponds to the .pxIcon control rule. Adding an icon. |
| Place a button into a cell or to the bottom of the form. When clicked at runtime, the button starts the action you assign to it. Adding a button. | |
| |
Add a checkbox representing a TrueFalse value. Corresponds to a .pxCheckbox control rule. Adding a Checkbox. |
| |
Add a radio button group representing a property value. Adding a radio button group. |
| |
Place a text link in a cell. When clicked at runtime, the link starts an action. Corresponds to a .pxLink control rule. Adding a Link control. |
| |
Add a text box containing a |
|
|
Add a Select control that presents a fixed list of values. Adding a Select control. |
| |
Include an image in the form. Adding an Image. GRP-1041 |
Click the down arrow (![]() ) in the Advanced
control group (
) in the Advanced
control group (![]() ) and select a control:
PROJ-649 5.4
) and select a control:
PROJ-649 5.4
Control |
Description |
|
|
Include in a cell a paragraph rule that presents read-only text and images using rich text. Optionally, you can link a SmartInfo pop-up section with the paragraph. Adding a paragraph. C-2526 |
|
|
Use an AutoComplete text box to present a drop-down list of dynamic choices computed by an activity. Adding an AutoComplete field. |
|
|
Add a red label that opens a pop-up SmartInfo section when the user hovers the mouse pointer over the label. Adding a Smart Label. PROJ-1019 |
|
|
Add a Dynamic Select control. Adding a Dynamic Select control. |
|
|
Add a control that allows multiple selections from a possibly long list. Adding a list-to-list control. |
|
|
Present rows of a report, optionally allowing selection. Adding a List View display. |
|
|
A cell can contain an interactive chart, defined by a summary view rule with a completed Chart tab. Adding a chart. |
|
For flow actions that are part of a composite application built with Internet Application Composer only. Add a hidden field to expose a property value, making it available to the external page that displays the composite application. Adding a Data Field control. |
|
|
|
Add a menu bar. See Adding a menu bar. GRP-237 5.5 |
| N/A |
 In addition to these Advanced
controls, you can add an interactive data displays to support quick
review or editing for a In addition to these Advanced
controls, you can add an interactive data displays to support quick
review or editing for a Page List or Value
List. Adding a Tree, Adding a Grid, Adding a Tree Grid. |
![]() Dragging a
property from the Application Explorer
Dragging a
property from the Application Explorer
You can complete two cells of a layout in one step if the left cell is to contain a text label and the right cell is to contain a field corresponding to a property on the Application Explorer.
Single Value property to
be placed in the field. Drag and drop the dot into the desired
cell. ![]() Including
properties from non-Work- classes
Including
properties from non-Work- classes
Normally, property references on the form are to
properties defined in the class corresponding to the Applies
To key part of the flow action rule (or to an ancestor class
of that class). In most cases, this class is derived from the Work-
base class. GRP-288 TASK-18332HG - changes, mentioned that there wasn't a Pages & Classes tab, not true
You can include a section in a Flow Action form that indirectly references properties in other classes. WERDA HERTC KARAF 3/7/06 clinic For example, to present properties from a page in the Data-Party-Gov class:
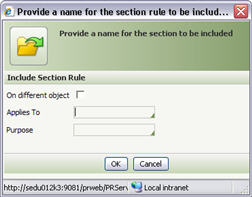 Complete
the pop-up dialog box that appears. Select On a
different object, and identify the Applies
To and Purpose key parts of the
Data-Party-Gov section. Click OK .
Complete
the pop-up dialog box that appears. Select On a
different object, and identify the Applies
To and Purpose key parts of the
Data-Party-Gov section. Click OK .
After you save this rule form, click the Preview toolbar button
(![]() ) to see a split-screen presentation of the runtime
appearance of the flow action rule, in read-write mode.
) to see a split-screen presentation of the runtime
appearance of the flow action rule, in read-write mode.

 Flow Action form
 About Flow Action rules