Make Payment Microjourney – Financial Services
The Make Payment Microjourney™ in Pega Customer Service™ for Financial Services allows customers to repay their bank liabilities quickly and conveniently. Customers can schedule a one-time payment with suggested amounts based on liability account data, from an account of their choice on a specific date. This Microjourney includes an extension point to integrate your bank’s payment system for straight-through processing.
- Business value
- Personas and usage
- Channels and usage
- Example: Web self-service
- Example: Web chatbot
- Example: Interaction Portal
- Stages and steps
- Data model
- Extending the Microjourney
Business value
The ability for customers to make payments on their bank liabilities is essential to financial institutions, and it should be as frictionless as possible. This Microjourney enables banks to offer this ability through convenient channels: Web self-service, Web chatbot, and assisted channels, in a simple yet effective way. The two self-service channels make the process quick and easy, limiting the volume of calls to the more costly assisted channel, while maintaining high customer satisfaction.
Personas and usage
- Customer – The bank customer who wants to make a one-time payment to any lending account (for example, credit card, line of credit, loan, or mortgage) by using Web self-service or a chatbot.
- Customer Service Representative (CSR) – The bank representative who uses assisted channels to capture the payment information.
Channels and usage
In this Microjourney, all channel interactions take place in the Intake stage. The rest of the stages have no channel because they are automated.
- Web self-service – This Microjourney assumes that the web self-service channel is the primary means by which clients initiate payment inquiries. This channel allows the use of payment dates other than the payment due date. It uses payment methods that are already set up.
- Web chatbot – Customer Service for Financial Services includes a sample configuration for using a chatbot. This channel uses payment methods that are already set up. It does not require a payment date, because it defaults to the payment due date, allowing the chatbot to provide a more focused and guided user experience.
- Interaction Portal – The CSR's user interface supports live and asynchronous customer interactions by using telephone, chat, email, and text. This channel allows adding payment methods and selecting payment dates other than the due date.
Example: Web self-service
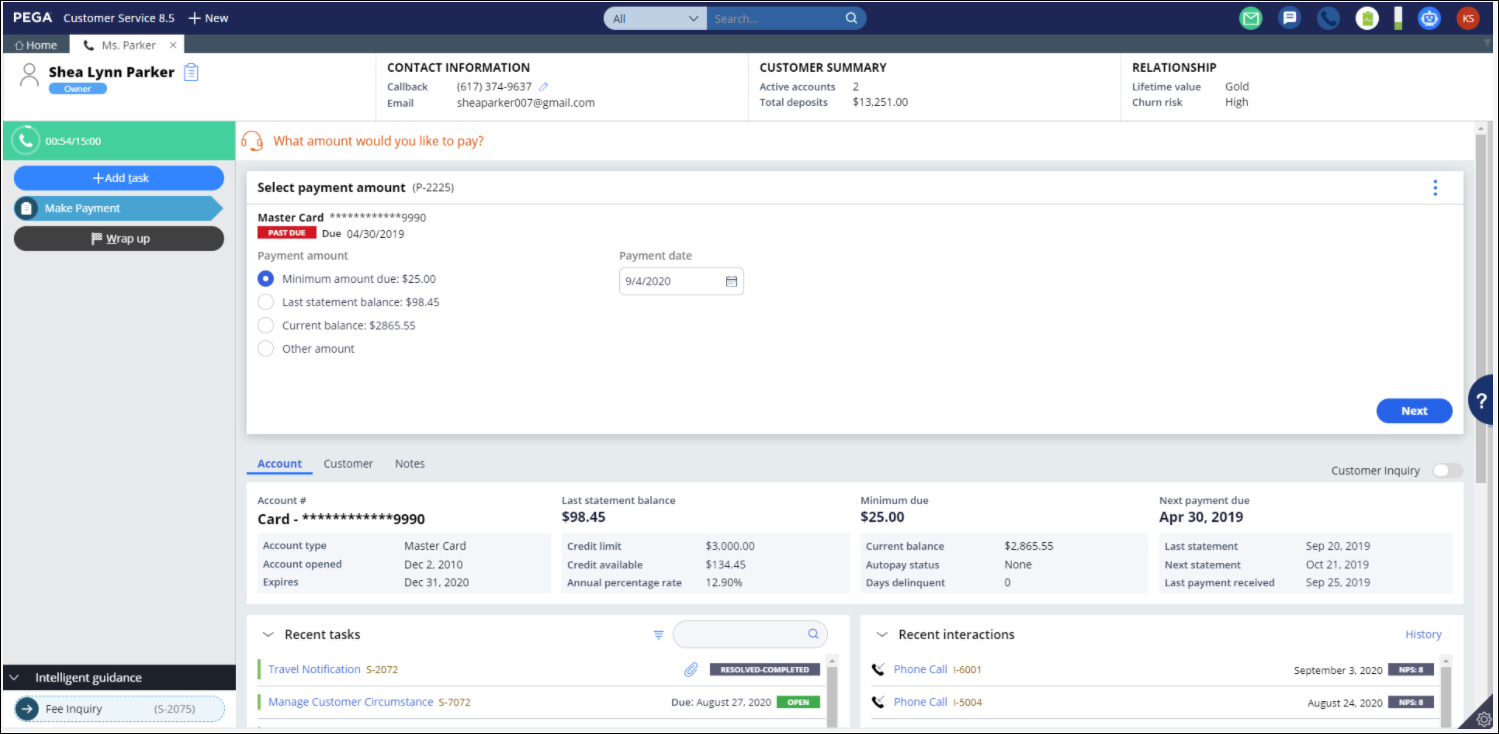
- Customers select the payment amount. Suggested quantities vary between loans and cards, and the actual amounts are retrieved from the account. The following example is for a credit card payment. In this screen the customer also selects the payment date, which defaults to the payment due date but can be easily changed.
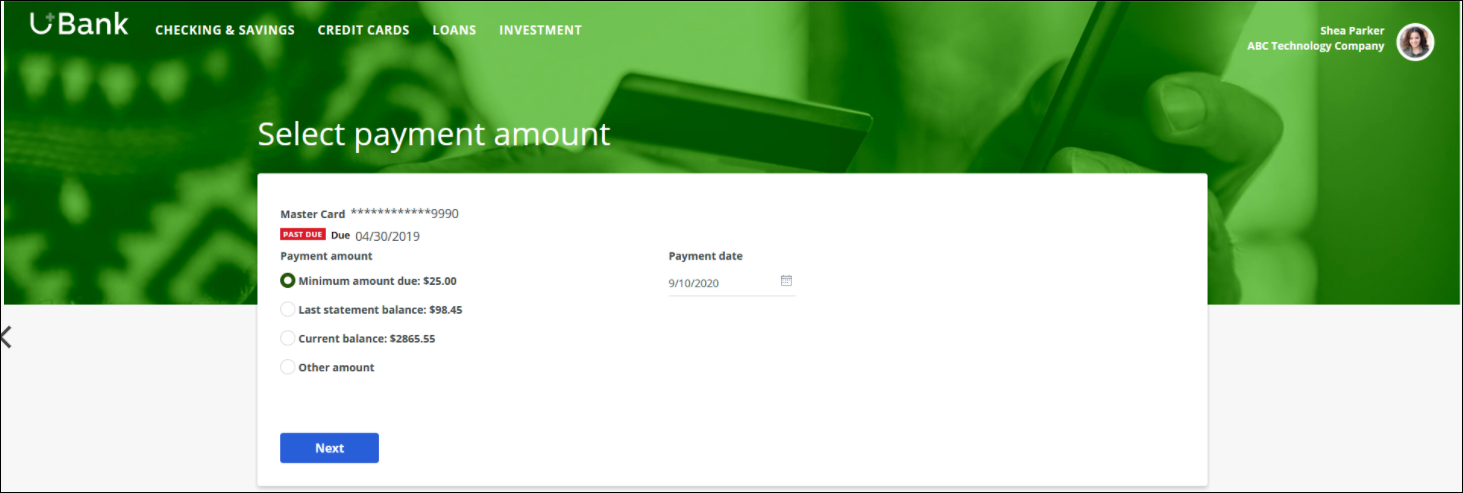
Select payment amount - Customers select the deposit account from which to make the payment.
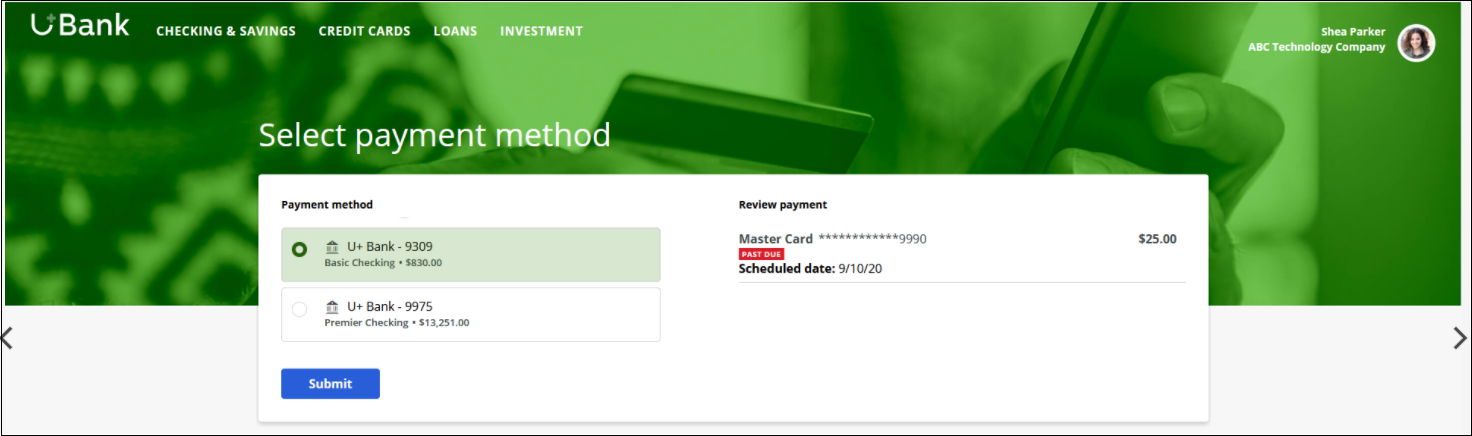
Select payment method
Example: Web chatbot
- Customers select the payment amount. Suggested quantities vary between loans and cards, and the actual amounts are retrieved from the account. The following example is for a credit card payment.
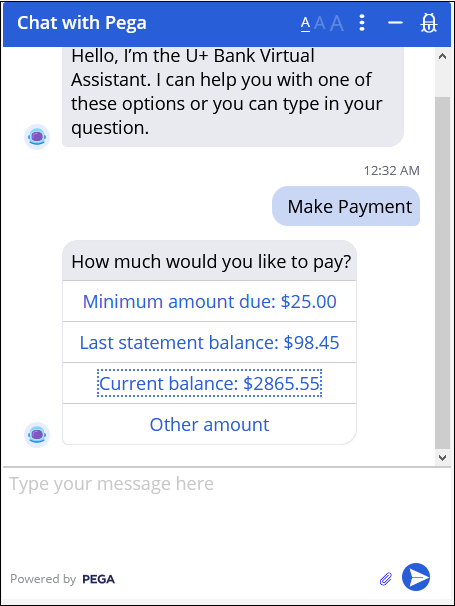
- Customers select the deposit account that will fund the payment. To provide a more focused experience, the payment date defaults to the payment due date.
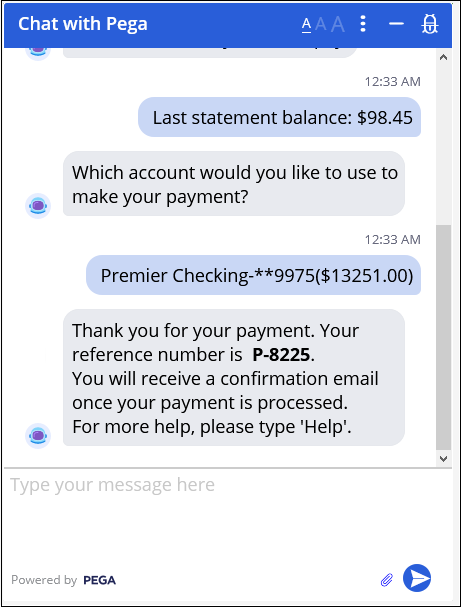
- The chatbot provides confirmation.
Example: Interaction Portal
- The CSR selects the payment amount. Suggested quantities vary between loans and cards, and the actual amounts are retrieved from the account. The payment date defaults to the payment due date but can be easily changed.
Interaction Portal - selecting payment amount - The CSR selects the deposit account that will fund the payment.

Interaction Portal page - selecting payment method - If the customer would like to choose a different account, the CSR can add that account by selecting the bank name, which populates the routing number, and then adding the name on the account, and the account number.
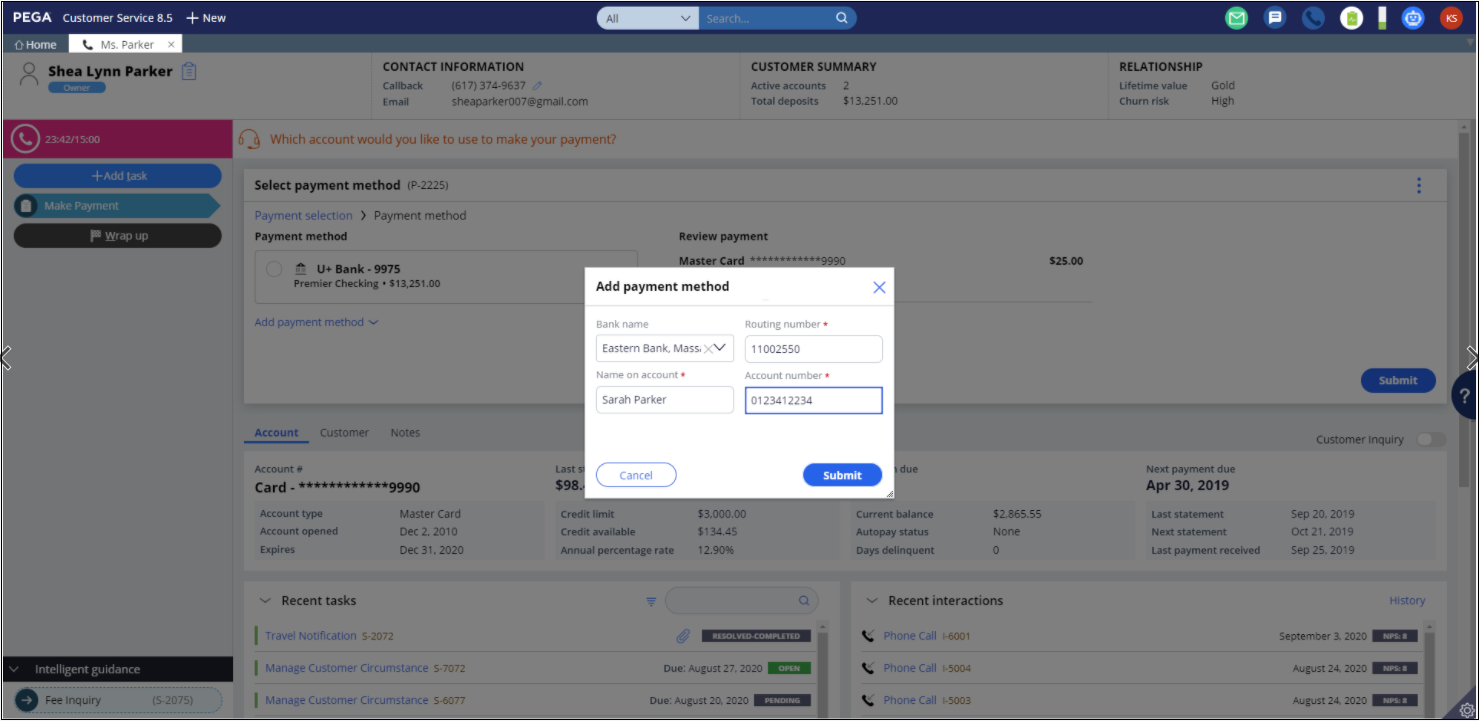
Interaction Portal - adding payment method
Stages and steps
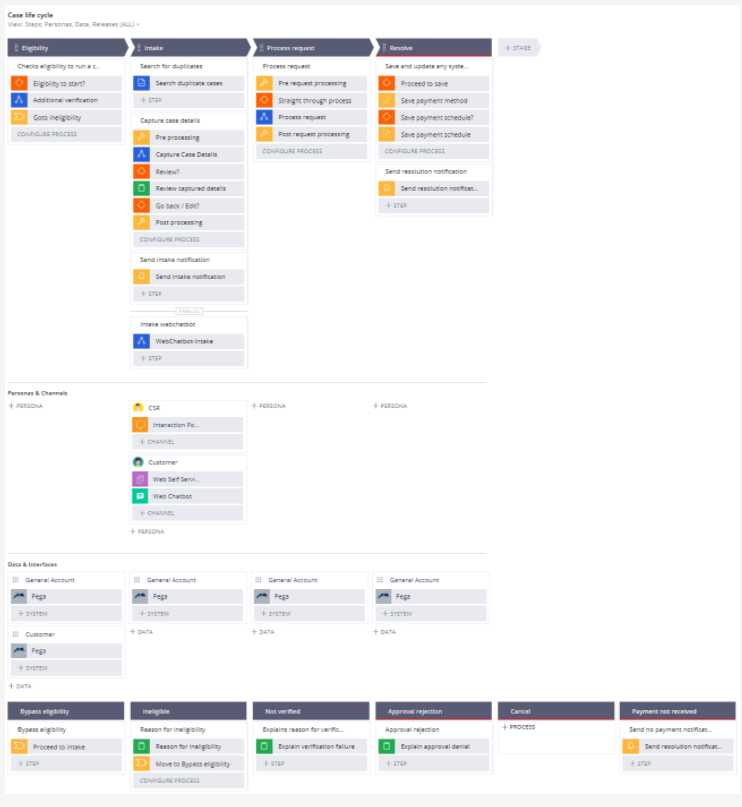
The project team can modify and extend most areas of this Microjourney in App Studio, thereby supporting users to Build for Change®. The following figure shows the stages and steps in this Microjourney.
- Eligibility – Determines whether the case can run or additional verification is required. This stage is disabled out-of-the-box. If you need more information about the new case template and how to enable this stage, refer to the < documentation new community link here>.
- Intake – Most of the Microjourney happens in this stage, where the payment choices are provided and submitted. Email confirmation of successful intake is sent.
- Process request – The payment is processed. There is an extension point to connect to your payment system for executing of the actual payment.
- Resolve – The case is resolved. Resolution notifications are sent with either successful or failed payment.
- Payment not received– This is an alternate stage that is used when a payment is not completed within the scheduled date. It sends a "payment not received" email.
Data model
Use the Data model page in App Studio to quickly view and understand the relationship between all data objects in the application. You can add, update, and delete data objects without exiting the visual data model. For information about the Data model page, see Data Modeling. For information about connecting to external data entities, see Managing data and integrations with the Integration Designer.
The following figure shows the entity relationship diagram (ERD) for this Microjourney. For each data object, the ERD shows only the properties that apply to this Microjourney.

Extending the Microjourney
The out-of-the-box Make payment case allows the customer to make a payment from a deposit account that is held either within the organization, or comes from an external source. This case can be used in other cases where payment is expected from a customer. You can update the D_RelAccountList data page to get the credit or loan account of a customer and the D_PaymentMethodList data page to get the list of all available payment methods for the customer to process the payment.
The D_PaymentOptions data page lists the options to make a payment such as Minimum Due, Last statement balance, Current Balance, and Next Payment Amount, if it is a loan account. Additional extension points are described in the following section.
Extension points
The following table lists and describes the extension points in this Microjourney that you can use to modify payment methods, payment options, notifications, and service-level agreements (SLAs).
| Rule name | Rule type | Purpose |
|---|---|---|
| CaptureCaseDetails | Flow | You can add or edit any steps in the process by selecting one or more account and payment methods. |
| PreAccountSelection | Data transform | Loads the payable account list. Also prepares payment options and discounts for each account, if the customer enables and selects AutoPayDiscount. |
| PostSelectingPaymentOption | Data transform | Customizes the logic to place the actual payment amount on the account based on the payment option and to handle any discounts. |
| ProcessRequest | Flow | Updates or adds any steps in processing the payment. For example, you can customize the flow by using an SLA to take further action if payment is not received. |
| SaveAndUpdate | Flow | Saves the newly added payment methods and payments scheduled for processing by customizing the D_PaymentMethodSavable and D_PaymentScheduleSavable data pages. |
| SendNoPaymentNotification | Flow | Sends a notification email to the customer if no payment was made on the scheduled date and the deadline has passed. You can use this rule to customize the notification if necessary, before sending to the customer. |
| Validation | Customizes payment selection and payment method pages. UseSelectAccountsto validate the fields of payment options such as Other Amount and Payment Date. The corresponding when conditions are also provided as an extension to customize both the conditions and message to be displayed. Use SelectPaymentMethod to customize the payment method selection. |
| PostProcessingProcessRequest | Activity | Allows any business logic to process the payment.
Use the ProcessPayment Connect-REST rule in this activity to pass the required payment data to an exposed service to process the payment. |
| Notification | You can customize these rules by updating corresponding subject and message rules, which are provided as field values. |
| Correspondence | You can extend these rules by customizing the paragraph rules that are embedded in them. |
WhatsNext | Decision |
Displays the next actions in the case processing. You can extend this rule based on your business needs. |
| Section | You can customize these sections to embed any new properties or sections. |
| MakePaymentSLA | SLA | Updates the goal and deadline with the dynamic property value references. You can customize the DueDate and DueDateExpiry properties by updating them with a defined date in the ProcessRequest flow rule. |
Previous topic Legacy Customer Service for Financial Services design patterns Next topic Manage Customer Circumstance Microjourney