Billing Inquiry Microjourney
The Billing inquiry Microjourney™ helps customer service representatives (CSRs) answer the most common questions customers have when calling in about their bill. CSRs can use billing inquiry to easily compare changes line by line for any two billing periods and search previous bills for a word, date or number that is related to a customer inquiry. Billing inquiry also provides helpful features such as previews of the next bill, explanation of taxes, summaries of billing changes, contextual information on hover, and indicators for one-time charges.
This microjourney supports scenarios to the call center and covers these topics.
- Business value
- Applications required
- Personas, channels and usage
- Example usage
- Stages and steps
- Data model
- Enabling the Microjourney
- FAQs
Business value
The Billing inquiry case helps CSRs save time by bringing together all key customer billing information on a single screen. Billing inquiry is the most common call type for communication companies and on average represents about 50% of total call volume. Communication companies can reduce call center AHT by using billing inquiry to reduce the friction CSRs encounter in assisting customers on billing inquiry calls.
Applications required
The Pega Customer Service™ for Communications - Core application is required for this microjourney.
Personas, channels and usage
| Persona (Actor) | Channel | Use case |
|---|---|---|
| Customer Service Representative (CSR) – Supports customers primarily through calls to the call center | Interaction Portal. | CSR addresses customer billing inquiries, supporting customers through available channels. |
Example usage
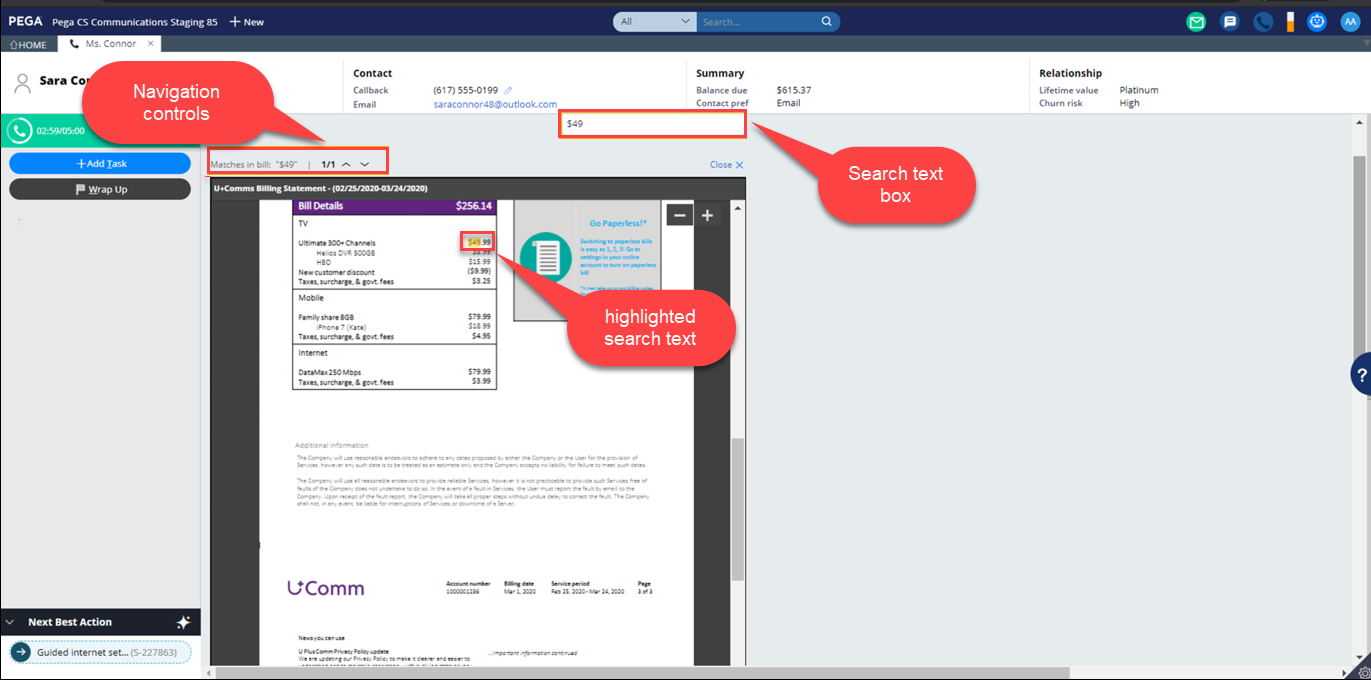
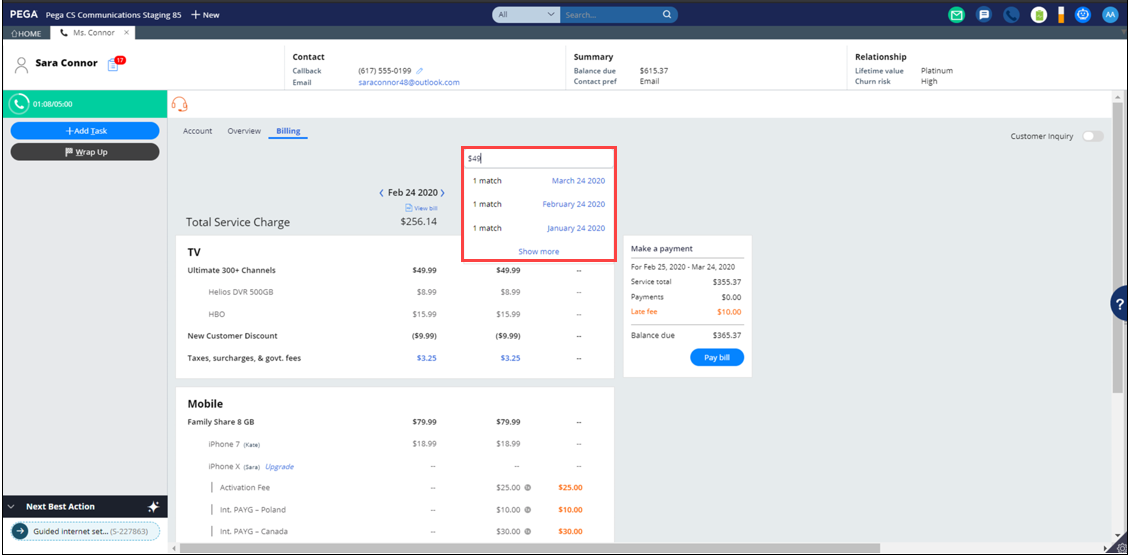
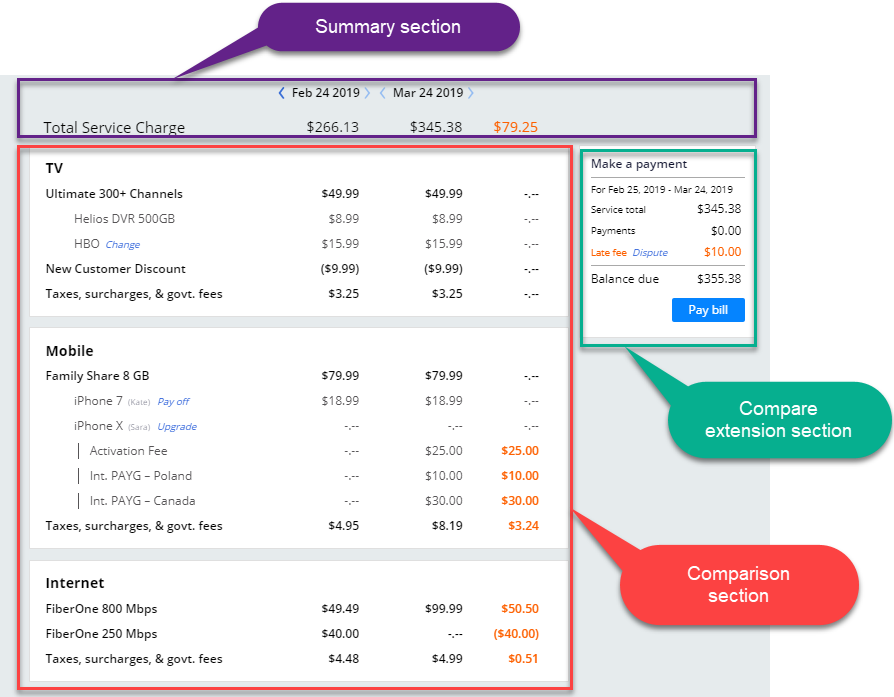
- View the two most recent bills and the difference between them.

Bill details of two different periods are compared and the difference is displayed in the third column. For detailed implementation steps, see Compare UI reusable component on Pega community.
- You can single-click to change the bill period.
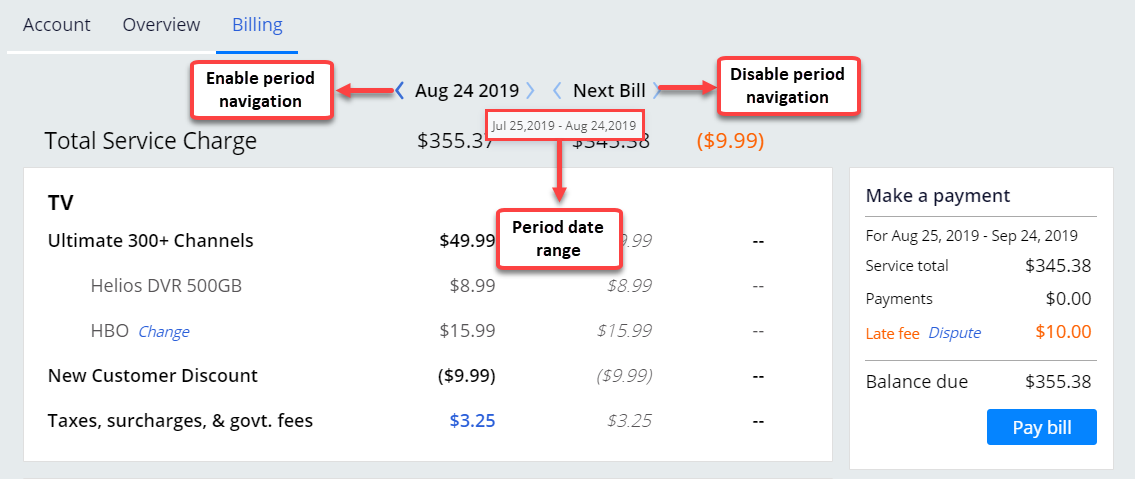
CSRs can use Left and right navigation arrows to change the billing period. The date range of a period can be seen by hovering over the period.
- View tax details.
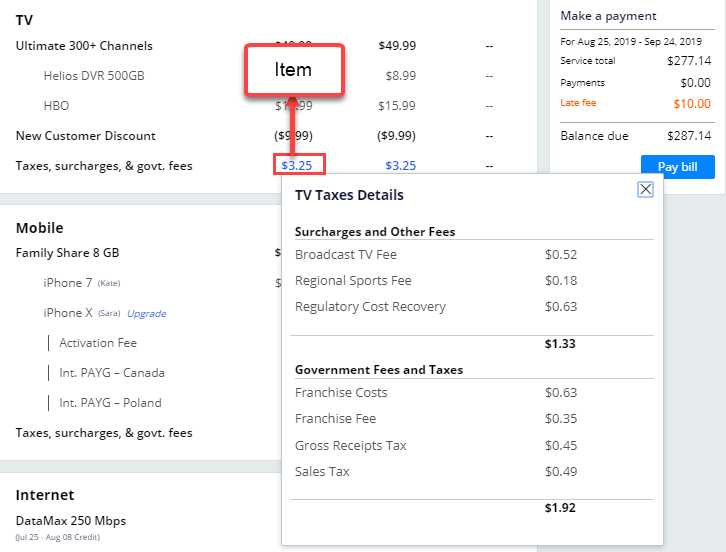
The tax details of a category can be viewed by clicking an item.
- Launch a case.
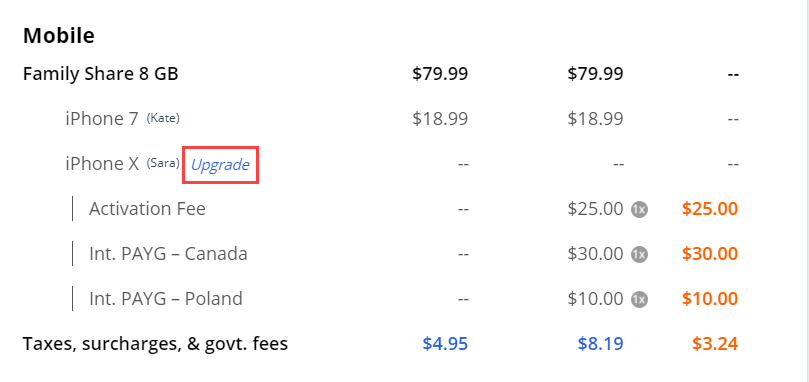
A case can be launched by clicking the link provided. For example, clicking the Upgrade link in the preceding figure starts the “Upgrade device” case.
- Line-item level information.
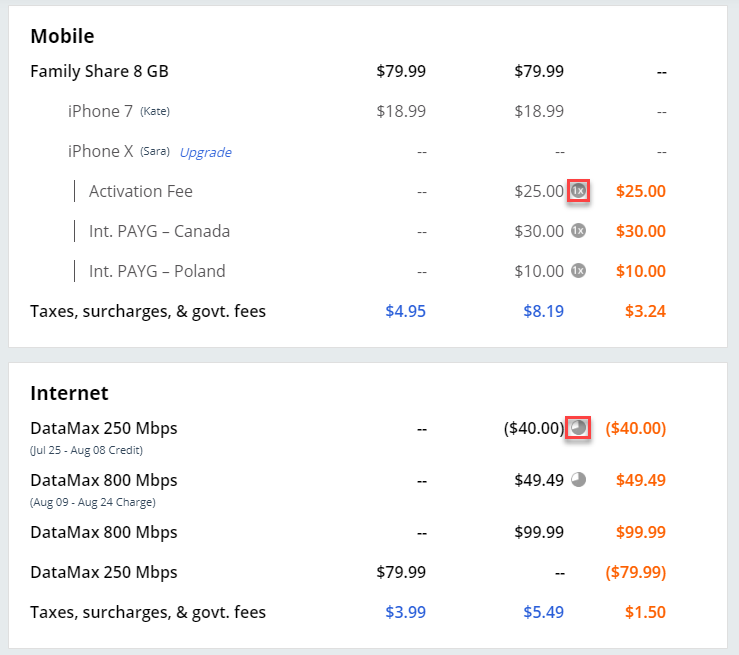
Prorated and one-time charges are identified by icons as shown in the preceding figure.
6. Search previous bills for a term, date or number that is related to the customer's inquiry. Note that this feature must be enabled to begin searching.
CSRs enter text in the Search text box, and then select a bill from the search results. The selected bill is displayed in the user interface with the search text highlighted. Use the navigation controls to advance through multiple search results in a bill.
Stages and steps
The following figure shows the stages and steps in the Billing Inquiry Microjourney.
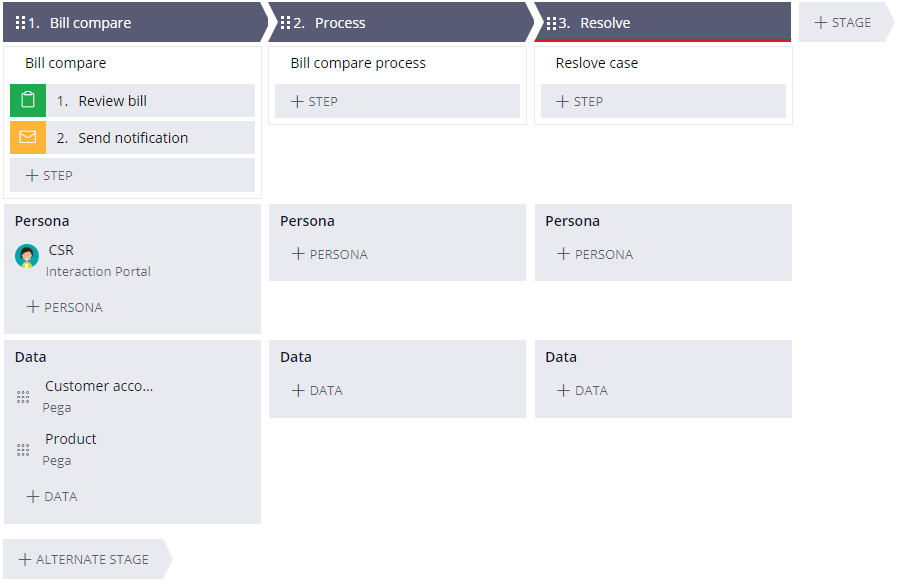
- CSR launches the bill comparison view in the billing inquiry case
- Sends the notification after the bill comparison is done.
Any implementation user can add a new process or new assignments to the current case or update the existing screens from the configuration view.
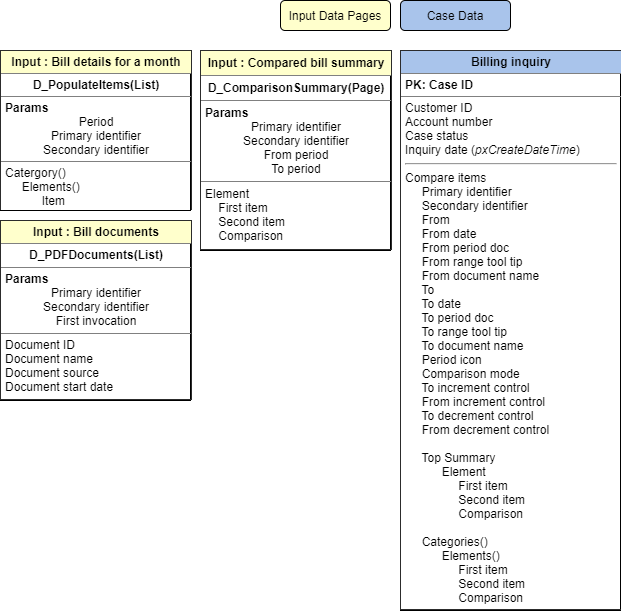
Data model
Use the Data model page in App Studio to quickly view and understand the relationship between all data objects in the application. You can add, update, and delete data objects without exiting the visual data model.
For information about the Data model page, see Data modeling. For information about connecting to external data entities, see Managing data and integrations with the Integration Designer.
The following figure shows the entity relationship diagram (ERD) for this Microjourney. For each data object, the ERD shows only the properties that apply to this Microjourney.
Enabling the microjourney
The Billing Inquiry microjourney is provided as a product offering and does not require additional configuration. However, to use the Bill search feature that is included, you must link to the Bill search feature to the data in your billing system. The extension points that are provided with the microjourney point to the source and populate the data.
Linking Bill search to your billing system
To link the Bill search feature with your billing system, populate the D_PDFDocument datapage with the document details from your billing system. To do this, override the data source of the D_PDFDocument datapage. You can fetch the document details by using a REST call or by fetching the records from the database.
Perform the following steps to override the data source for the D_PDFDocument datapage:
- In the Dev Studio left navigation pane, select Data model > data transform.
- Open the SourcePDF data transform. This data transform is called from the activity that shows the properties that you need to set.
- In the Activity name field, enter SourcePDF.

- Open the SourcePDF activity.
- Set the following properties by using the document details, as shown in the following example:
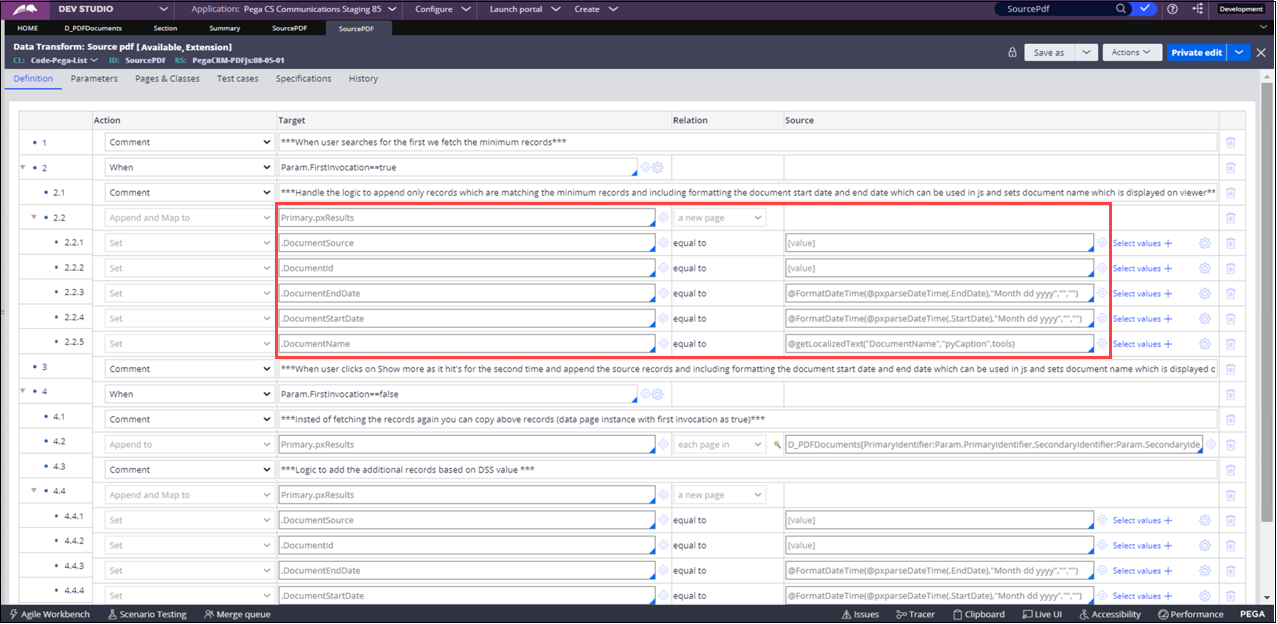
- Save your changes.
Optional: Configuring the Bill search results display
By default, when you perform a search, the first three search results are displayed in the results list. Any additional search results are displayed, a maximum of nine items at time, when you click Show More.
You can change the number of documents displayed in the initial search results and the number of documents displayed when you click the Show More link by configuring the following dynamic system settings:
- MinimumRecords - Use to set the number of documents displayed in the initial search results.
- AdditionalRecords - Use to set the number of additional documents displayed when you click the Show more link in the search results list.
Extension points
| Number | Rule type | Rule name | Purpose |
|---|---|---|---|
| 1 | Section | CompareExtn | Placeholder section to display implementation- specific data along with the comparison section |
| 2 | Data transform | CompareValue | Place comparison logic based on the item type |
| 3 | Activity | PopulateItems | Point to a source and populate the data based on period |
| 4 | Data transform | PopulateItems | Populate the data based on period |
| 5 | Data transform | SetCompareItemsPage | Populate ‘.CompareItems’ page property with the data that acts as inputs to populate data from the source and other default values |
| 6 | When | ShowItemizedInfo | Place logic to determine when to show additional details at the item level of an element |
| 7 | Data transform | CreateAdditionalInformation | Populate the data for the additional details |
| 8 | Data transform | Determine Summary | Place logic to determine the summary for the additional details |
| 9 | Section | ItemizedElementsSummary | Placeholder section to display summary for the additional details in required format |
| 10 | Activity | SetSummaryData | Point to a source and populate the summary data |
| 11 | Data transform | SetSummaryData | Populate summary data |
| 12 | Data transform | UpdateFromToMonths | Provide dynamic styling and value for period navigation |
The Compare user interface consists of the following sections:
- Compare extension – A placeholder section for implementing applications. Extension point 1 applies to this section.
- Comparison – Lists categories and the elements within each category. The element level shows items and the comparisons between them. The extension points 2 through 9 apply to this section
- Summary – Contains the top summary, additional information (conditional display), and navigation between time periods. The extension points 10, 11, & 12 apply to this section.
FAQs
When adding common extensions, are there upgrade considerations ?
No, there are no upgrade considerations.
Should I brand the UI?
No.
Previous topic Guided Internet Setup Microjourney Next topic Capturing customer events in a repository