Analyzing content from Webhose.io in NLP Sample in real time
You can use the NLP Sample application to analyze the text data from Webhose.io in real time. Webhose.io is a service for aggregating records from forum discussions, news feeds, and blogs. By using Webhose.io, you can establish specific criteria for content filtering (for example, by keywords, language, country, site, site type, and so on) to collect and analyze only the content that is important for achieving your business goals.
In this tutorial, you create the Pega 7 Platform infrastructure that supports text analysis of Webhose.io content. You create a data class to contain the required rule instances. In that class, you create a stream data set whose available services are used to gather Webhose.io records in real time. These records are transformed into clipboard pages by a data transform and are later processed by a text analyzer that is configured for sentiment, classification, and entity extraction analysis. You also design a processing pattern for your rules by using a data flow. Finally, you trigger the record extraction and analysis by starting a data flow run.
Prerequisites
Before you start this tutorial, do the following tasks:
- Register a Webhose.io account to be able to access live data with the Webhose.io API. For more information, see the Webhose.io documentation.
- Install the NLP Sample application. For more information, see Exploring text analytics with the NLP Sample application.
- Create a Java connector that extracts Webhose.io records as soon as they are posted and forwards them to the stream dataset.
Analyzing content from Webhose.io
- Create the Webhose.io class and associated properties
- Create a stream data set
- Create a Data Transform rule to convert Webhose.io JSON records
- Create a Text Analyzer rule to analyze the text content
- Create and trigger a Data Flow rule that contains the rules for analyzing Webhose.io records
- Test your configuration
Creating the Webhose.io class and associated properties
Create a Webhose.io subclass within the Data-Social parent class of your application. The subclass stores the clipboard properties of Webhose.io records. For detailed information about creating classes and properties, see Class rules - Completing the Create, Save As, or Specialization form and Properties - Completing the Create, Save As, or Specialization form.
- In the Explorer panel of Designer Studio, click App.
- Use the Applications search field to navigate to the Data-Social class of your application.
- Under the Data-Social class, create a Data-Social-Webhose class.
- In the Data-Social-Webhose class, create a clipboard property called text (case-sensitive) whose mode is Single Value and the string type is Text.
Creating a stream data set
Create a data set of type Stream in your application to analyze the Webhose.io records as soon as they are posted.
- In the Explorer panel of Designer Studio, click App.
- In the search field, enter Data-Social-Webhose.
- Right-click Data-Social-Webhose, and click + Create > Data Model > Data Set.
- Enter a label for the data set.
- From the Type list, select Stream.
- Click Create and open.
- On the Stream tab of the data set form, review the information about the available services that populate the data set. Each stream data set contains information about the REST and WebSocket services that handle a stream data set as a resource that is located at:
- For REST – http://<HOST>:7003/stream/<DATA_SET_NAME>, for example, http://10.1.1.13:7003/stream/WebhoseStream
- For WebSocket – ws://<HOST>:7003/stream/<DATA_SET_NAME>, for example, ws://10.1.1.13:7003/stream/WebhoseStream
Use the provided REST or WebSocket addresses as the destination in the Java or other third-party connector that relays records from Webhose.io to the Pega 7 Platform. - Optional: On the Settings tab, configure the following settings:
- Require basic authentication – Enable this setting to require authentication for each incoming record. The records are authenticated with your user name and password.
- Log file size – Specify the size of the log files, between 10 MB and 50 MB. The default value is 10 MB.
- Retention period – Specify how long the data set keeps the records. The default value is 1 day.
After you save the rule, you cannot change any settings.
- Click Save.
For more information, see Data Set rule form - Completing Data Sets.
Creating a Data Transform rule
Create a data transform to convert JSON fields of Webhose.io records into a clipboard page that contains the text property.
- In the Explorer panel of Designer Studio, click App.
- In the search field, enter Data-Social-Webhose.
- Right-click Data-Social-Webhose, and click + Create > Data Model > Data Transform.
- Enter a label for the data transform.
- Click Create and open.
- On the Definition tab of the data transform form, do the following actions:
- In the Action column, select Set.
- In the Target column, enter .pyText.
- In the Source column, enter .text.
- Click Add a row.
- In the Action column, select Set.
- In the Target column, enter .pySource.
- In the Source column, enter "Webhose".
- Click Save.

Webhose.io data transform
Creating a Text Analyzer rule
Use Text Analyzer rules to process the Webhose.io text data that your application sources from the stream data set. You can use a variety of tools for analyzing and structuring the text data to obtain the business intelligence that is vital for accomplishing your business goals, such as identifying and responding to dissatisfied customers, discovering business trends, and so on.
- In the Explorer panel of Designer Studio, click Records.
- Expand the Decision list.
- Right-click Text Analyzer, and click + Create.
- On the Create form, provide the following information for the new rule:
- Enter a label for the text analyzer.
- In the Apply to field, press the Down Arrow key and select Data-Social.
- Specify the ruleset and ruleset version.
- Click Create and open.
- On the Select analysis tab of the Text Analyzer form, configure one or more of the following options:
- Configure sentiment analysis settings – Define the sentiment lexicons and models to use for opinion mining.
- Configure classification analysis settings – Define the taxonomy (that is, a collection of predefined categories that are associated with specific keywords) to use for detecting the categories that text data can be assigned to.
- Configure entity extraction analysis settings – Define topics, entity extraction models, and entity extraction rules to extract only the data that is of interest.
Use the Text Analytics landing page to create and train custom models for sentiment and classification analysis. Using a wizard, you define the type of model and the training algorithm. You also upload training and testing data, train the model, and review its accuracy. You can use the models (as decision data binary files) in text analysis. You can also export the models. - On the I/O mapping tab of the Text Analyzer form, configure the following parameters:
- Input text.pyText
- Outcome.pyOutcome
- On the Advanced tab of the Text Analyzer form, configure the settings for the analysis types that you enabled on the Select analysis tab:
- Configure the language settings – Control how your application detects the language of the text data.
To have the language detected by the source provider (if available), select the Language detected by publisher check box.
- Configure the sentiment settings – Adjust the score range for sentiment detection. For example, by narrowing down the score range of the negative sentiment, you can identify only the most negative feedback that needs to be responded to quickly.
- Configure spelling checker settings – Enable the spelling checker to increase the confidence score of the data that you categorize (that is, the data is categorized more accurately).
- Configure classification settings – Define the granularity level for text classification (sentence level or document level).
- Configure the language settings – Control how your application detects the language of the text data.
- Click Save.
Creating a Data Flow rule
Combine the rules that you created into the processing pattern of a data flow.
- In the Explorer panel of Designer Studio, click App.
- In the search field, enter Data-Social-Webhose in the search box.
- Right-click Data-Social-Webhose, and click + Create > Data Model > Data Flow.
- Enter a label for the data flow.
- Click Create and open.
- Double-click the Source shape and do the following actions:
- In the Source properties dialog box, from the list, select
- From the list, select a Webhose.io stream data set, and click Submit.
- Click the connector that radiates from the Source shape, and select Data Transform.
- Double-click the Data Transform shape, and do the following actions:
- Enter the shape name.
- In the Data Transform field, press the Down Arrow key and select the Webhose.io data transform.
- Click Submit.
- Click the connector that radiates from the Data Transform shape, and select Text Analyzer from the list.
- Double-click the Text Analyzer shape and do the following actions:
- In the field, select a Text Analyzer rule.
- Click Submit.
- Double-click the Destination shape and do the following actions:
- From the Destination list, select Activity.
- From the Activity list, select pxSaveSummaryForReporting. By selecting this activity, you can see the analyzed records and the results of text analysis in NLP Sample.
- Click Submit.
- Click Save.
- On the Data Flows landing page, start a real-time data flow run that references the Data Flow rule that you created to process the Webhose.io data.
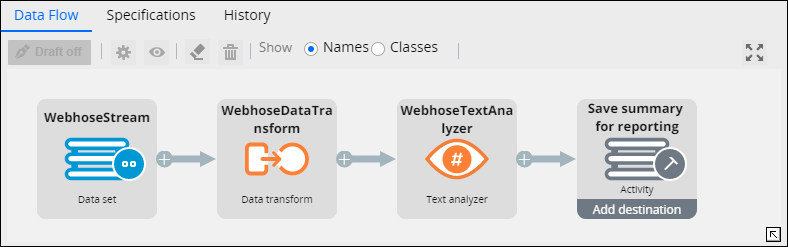
Data flow pattern for analyzing Webhose.io records
Testing your configuration
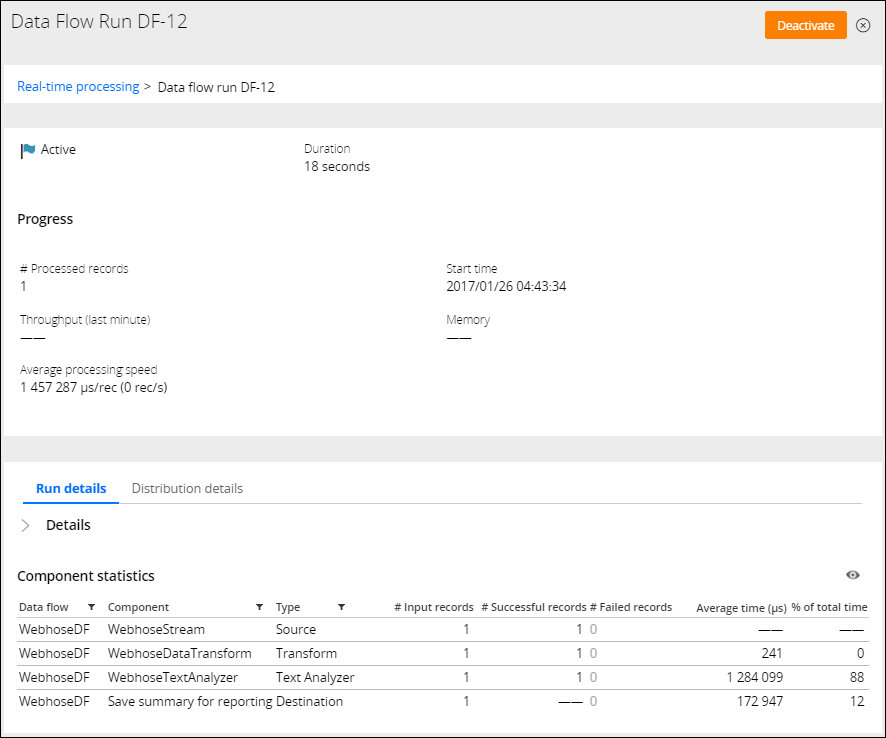
You can test your configuration by using third-party software (for example, Google Postman) or scripts to send sample JSON records that mimic Webhose.io records. If the configuration is correct, the records appear as successfully processed on the Data Flow Run page.
Sending records for testing
To verify the accuracy of the text analyzer, you can also access the NLP Sample application, view the test records, and inspect the analysis results.
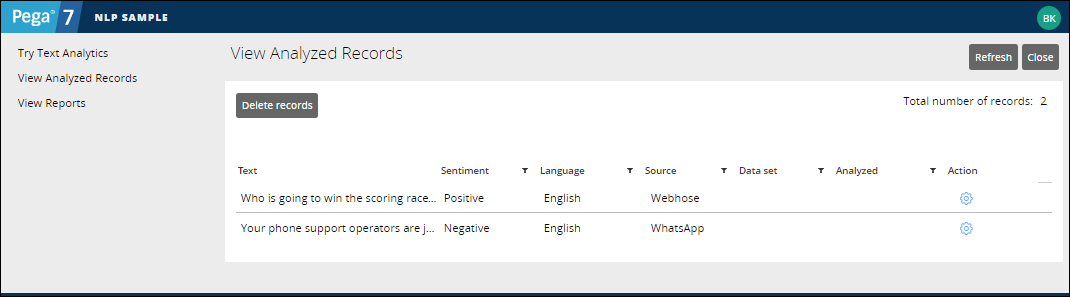
Analyzing the test records
Previous topic Analyzing WhatsApp content in NLP Sample in real time Next topic Analyzing the text-based content posted on social media in Pega 7.2.2