Setting up the IVA for SMS/MMS (Twilio)
Ensure that users can interact with your Pega Intelligent Virtual Assistant™ (IVA) by sending SMS or MMS messages from a mobile phone. As a result, you make your business services available to users on a convenient messaging platform as a chatbot, helping to address their important business needs. You need to set up a Twilio account for the phone number that is used by your application as a chatbot.
For example, for a financial bank application, customers can send SMS messages to your chatbot to obtain the current balance on their savings account.
You access Digital Messaging Manager in the Unified Messaging
channel to configure individual messaging accounts from one place for your application.
- In the header of Dev Studio, click the name of the application, and then click Channels and interfaces.
- In the Current channel interfaces section, click the icon that represents your existing Unified Messaging channel.
- In the Unified Messaging channel, click the Connection tab.
- Click Integration Manager.
- In the Digital Messaging Manager window, click Add Connection, and then click the SMS icon.
- On the New Twilio SMS page, in the Name field, enter a name for your Twilio account.
- In the Number field, enter the phone number, including the country code, for your Twilio account.
- In the Account SID field, enter the identifier for your
Twilio account.Twilio generates a unique identifier when you create a Twilio account.
- In the Auth token field, enter the authorization token
for your Twilio account.Twilio generates an authorization token when you create a Twilio account.
- In the Add country list, select a country code for which
you allow to send messages to your application, and then click
Add.
For example: The following figure shows sample configuration settings for SMS/MMS:
The configuration settings for SMS/MMS 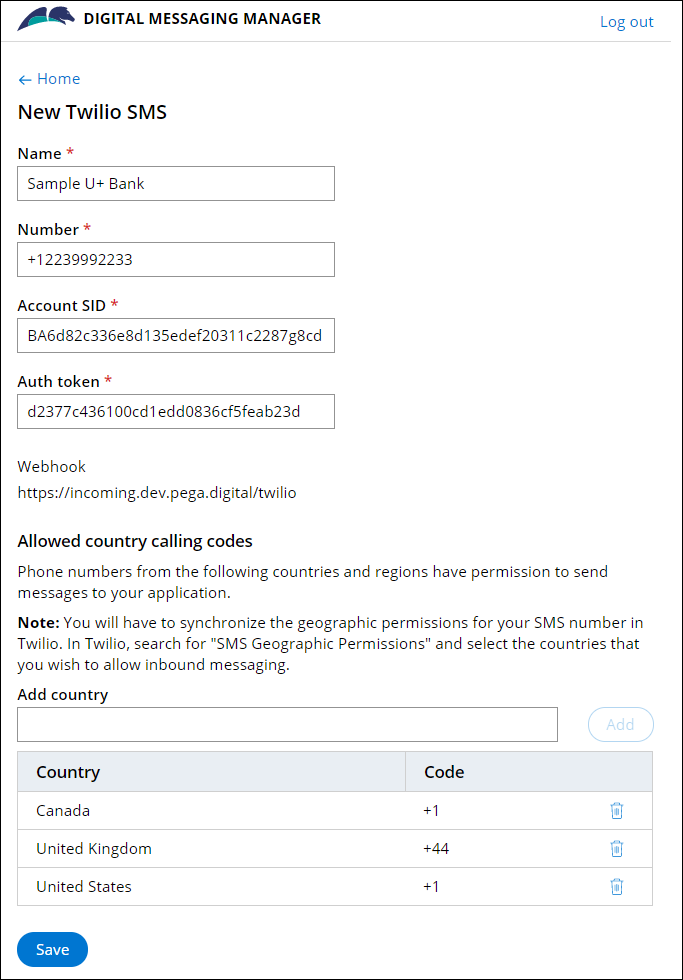
- Optional: To add more country codes, repeat step 10.
- Click Save.
- In the Webhook section, highlight and copy the generated webhook URL for Twilio.
- Optional: To display all of your configured accounts for messaging platforms in the Digital Messaging Manager window, click Home.
- Close the browser window, and then in the Unified Messaging channel, click Save.
- Access your account on the Twilio portal, click Manage Numbers, and then click Active Numbers.
- In the Messaging section, in the field next to the
A Message Comes In webhook section, paste the webhook
URL that you copied in step 13. This action ensures that when your Twilio phone number receives inbound SMS or MMS messages, Twilio forwards the messages to the IVA channel.
Previous topic Setting up the IVA for Facebook Messenger Next topic Setting up the IVA for Twitter