Attaching content to a case
Facilitate business interactions and provide users with the supporting information for a case by attaching relevant correspondence and documentation to a case type. Use the Attach Content shape in design time to control the kind of information that case workers add to a case.
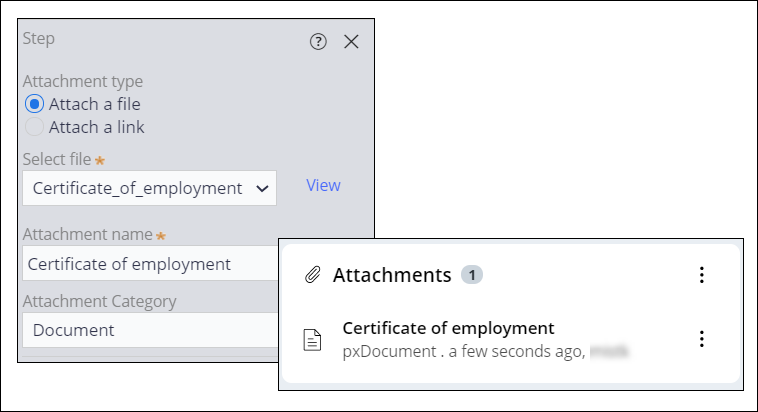
For example, in a loan request case, you can attach a certificate of employment form, which the case worker can provide to a customer to ensure that customers always complete the standard form.For relevant training materials, see the Organizing and managing access to case attachments module on Pega Academy.
- Add the Attach Content shape to the life cycle of your case type:
- In the navigation pane of App Studio, click Case types, and then click the case type that you want to open.
- In the stage in which you want users to be able to attach content, click .
- Click Select.
- In the Step properties pane, select and configure the attachment
type:
Choices Actions Attach a document - Click Attach a file.
- Click Upload.
- In the Upload a file window, click Choose File, and then select the file to upload.
- Click Done.
- In the Select file list, select the file to attach.
- In the Attachment name field, enter a descriptive name for the file.
- Optional: To change the business classification of the attachment, select an option in
the Attachment category field.
Attach a URL - Click Attach a link.
- In the URL field, enter a URL that points to an external file or resource on the Internet.
- In the URL name field, enter a descriptive name for the link.
- Optional: To change the business classification of the attachment, select an option in
the Attachment category field.
Attach a note (available only in Dev Studio) - In the navigation pane of Dev Studio, click Case types, and then click the case type that you want to open.
- Perform steps 1b through 1c.
- In the Step properties pane, click Attach A Note.
- In the Note text field, provide a note that you want to attach.
- In the Attachment description field, enter a descriptive name for the note.
- Optional: To provide more information for auditing purposes, in the Audit note field, enter additional information.
- Click Save.
Previous topic Adding an automated step to a process Next topic Attaching screen captures to a case

