Sourcing attachments from external storage
Gain access to third-party documents and enhance collaboration between stakeholders by configuring external storage as a source of content that you can attach to your case, space, or Pulse conversation.
Sourcing from external storage enables you to use more relevant data in your business process. For example, you can configure an external source for attachments for CSRs who manage loan requests to ensure that they use the most up-to-date version of the necessary documents, such as the Terms and Conditions document.
As a best practice, use repositories for case attachments. Repositories use data streaming to present attachment data directly to your application. When you use web storage or CMIS, Pega Platform places data on the clipboard before use in the application, which uses more system resources.
Your environment type determines the repositories that you can configure for your external content for case, space, or Pulse attachments:
- In Pega Cloud environments, you can use
pegacloudfilestorage and the
/attachmentssubfolder as the repository for case attachments, or you can configure another type of repository.Before integrating the repository in your application, you can change the repository that you use for case attachments to another external repository type after you create the repository.
For more information, see Creating a repository.
- In on-premise and client-managed cloud systems, you specify an external repository for
case attachments after you create the repository.
For more information, see Creating a repository.
- In the header of Dev Studio, click the name of the application, and then click Definition.
- On the Application form, click the Integration tab.
- In the Content sourcing section, configure at least one external
storage system:
Choices Actions A web service provider - Select the Source from web storage providers checkbox.
- In the Provider list, select an installed web storage provider for which you have an account and a content location.
- In the Authentication profile box, enter or select an
authentication profile of the OAuth 2.0 type.
- Optional: To change the label that users see when they add an attachment from this web storage provider, enter a description in the Label field.
- Optional: To use content from more than one web storage provider, click Add, and then repeat these steps to configure another provider.
A repository - Select the Source from repositories checkbox.
- In the Repository list, select a repository for which
you have an account and a content location.
- Click Browse, and then select the folder from which to
source attachments.
- Click Select.
- Optional: To change the label that users see when they add an attachment from this repository, in the Label field, enter a description.
- Optional: To use content from more than one folder, click Add.
CMIS systems - Select the Source from CMIS systems checkbox.
- Optional: To change the label that users see when they add an attachment from this source, in the Label for this content source (where available) field enter a description.
For example: Application configured to enable the sourcing of content for attachments from a web storage provider and a repository 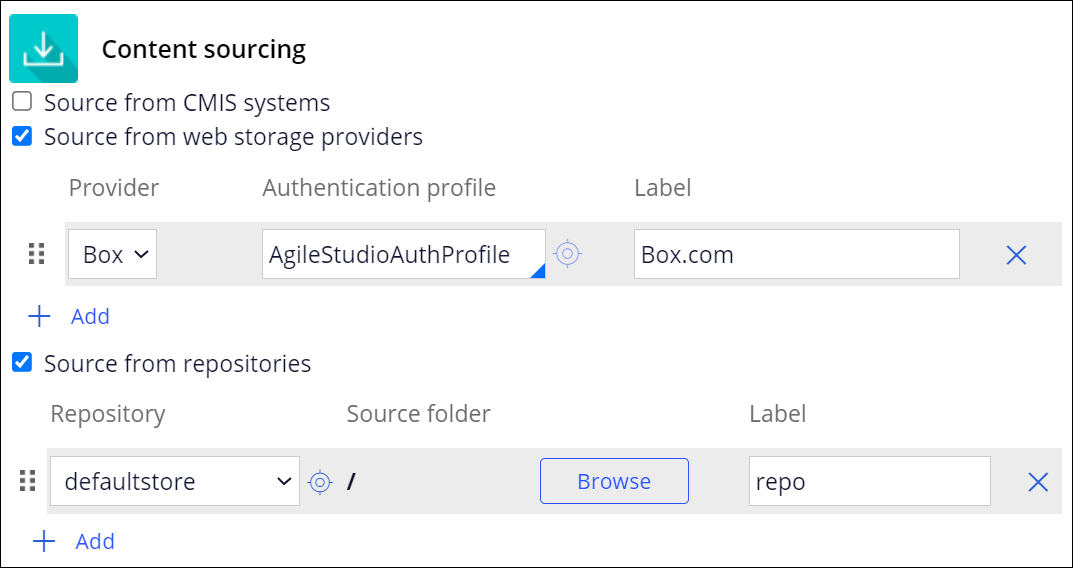
- Click Save.
Adding attachments from external locations
Provide more data and relevant context to your work by supplementing your case, space, or Pulse conversation with external content.
- Log in to a portal, and then add an attachment from an external location:
Choices Actions Add a case attachment - Create or find a case to which you want to attach external content.
- In the upper-right corner, click the Expand the utility pane icon.
- In the Files & documents section, click the
Manage files and documents icon, and then in the
Manage content dialog box, click the menu option from
which you can add files from an external system.
The options in the menu show the values that you provide in the Label field on the Integration tab of your application rule. For more information, see Sourcing attachments from external storage.
For example: The external storage options configured for the application shown in the menu 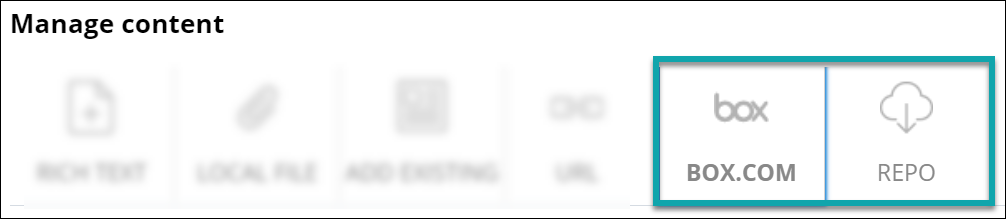
- Attach a file from your external system.
- Click Submit.
Add a space attachment - In the navigation pane, click Spaces.
- Click the space to which you want to add content.
- In the upper-right corner, click the Expand the utility pane icon, and then click the Related tab.
- In the Files & documents section, click the
Manage files and documents icon, and then in the
Manage content dialog box, click the menu option from
which you can add files from an external system.
The options in the menu show the values that you provide in the Label field on the Integration tab of your application rule. For more information, see Sourcing attachments from external storage.
For example: A menu with the external storage options configured for the application - Attach a file from your external system.
- Click Submit.
Add a Pulse attachment - Find or create a Pulse message to which you
want to add content.For more information, see Viewing your activity feed and Posting a message in Pulse.
- In the field that is displayed in the Pulse section,
click , and then click an option from which you can add files from an
external system.
The options in the menu show the values that you provide in the Label field on the Integration tab of your application rule. For more information, see Sourcing attachments from external storage.
For example: Attaching files from external locations in Pulse 
- Attach a file from your external system.
- Click Post.
- Create or find a case to which you want to attach external content.
Adding case attachments from a CMIS system
Enable users to access content stored in external sources by adding an attachment from a CMIS system to a case. Downloading content from an external CMIS system guarantees that users use the most up-to-date version of documents.
You can use any CMIS-compatible server to source data for your application.
- Log in to a portal, and then create or find a case or space to which you want to attach a file from a CMIS system.
- In the upper-right corner, click the Expand the utility pane icon.
- In the Files & documents section, click the Manage files and documents icon, and then in the Manage content dialog box, click the Content from CMIS tab.
- In the Select a file section, select a file from one or more CMIS
systems.
- The CMIS systems in the list correspond to the Connect-CMIS rules that are available for the current operator.
- The files in a CMIS system come from the CMIS repository that you configure in your Connect-CMIS rule that references the system.
- In the Name field, provide a name for the attachment.
- Click Submit.
- Optional: To remove a case attachment, click the Show more icon next to the name of the attachment, and then click Delete.
Managing case attachments stored in a CMIS system
Manage versions of a case attachment that is stored in a CMIS system at run time to control which version of the attachment you want users to download.
- Click the Gear icon next to the name of the attachment.
- In the Manage attachment window, in the Version history section, click the file name for the appropriate version of the attachment to download.
- Optional: To prevent other users from modifying the file attachment, select Lock this attachment for local editing.
- Click Upload new version to check in the new version of the file.
Previous topic Enabling cases for creation through web and chat channels Next topic Storing case attachments using external storage