This documentation site is for previous versions. Visit our new documentation site for current releases.      
 

Configuring content for customer composite tabs (Admins only)

Updated on December 3, 2021

If you are an administrator, then you can change the content of composite tabs to best meet the needs of your CSRs, for example, to hide infrequently used data. In App Studio Preview mode, the New menu includes a Configure customer composites option that is visible only to administrators with the PegaRULES:SysAdm4 access role, and only if you enable the newest customer composite feature.

For information about using Design mode to change the layout of the customer composite, see Design templates.

Pega Customer Service Implementation Guide
Before you begin: Enable the new version of customer composites if needed. For information, see Adopting the new customer composites in the CRM 8.6 Update Guide.
  1. Log in to your application in App Studio as an administrator operator with the PegaRULES:SysAdm4 access role.
  2. In the header of App Studio, click Preview to launch the Interaction Portal.
  3. Click NewConfigure customer composites.
    Result: The page displays the composite tabs.
    Configure customer composites page
    The Configure customer composites view shows each tab so that you can change the data displayed
    Note: The sample data that is shown on the composite tabs is defined in the CPMDemoScreenPop data transform. You can change that sample data by modifying that data transform.
  4. Click the name of the tab that you want to modify to make it active.
  5. Click Design to modify the data on that tab.
  6. Hover over the tab until the Workarea is displayed, and then click the Edit this work area icon, as shown in the following example:
    Edit this work area icon
    Click the Workarea link to begin editing the tab content
  7. Optional: To change the template, in the right pane, click Change.
    Note: The default template, Composite with primary and widgets, includes three sections where you can display data. If you use the default template, the data widgets are organized into categories for easy selection. If you use a different template, the data widgets are listed under a single category, Widgets.
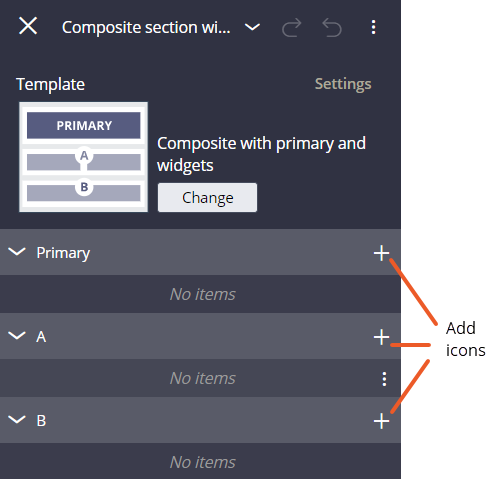
  8. Next to a section name, add a data widget by clicking the Add icon for one of the sections:
    • To add the widget to an area that extends across the entire width of the tab, add the widget to Primary section.
    • To add the widget to an area on the left side of the tab, add the widget to section A.
    • To add the widget to an area on the right side of the tab, add the widget to section B.
    The following figure shows the sections for the default template:
    Sections in the default template
    The default template has three sections where you can add the widget, the Primary section (entire width of the tab), section A (left side of the tab), and section B (right side of the tab).
    Result:

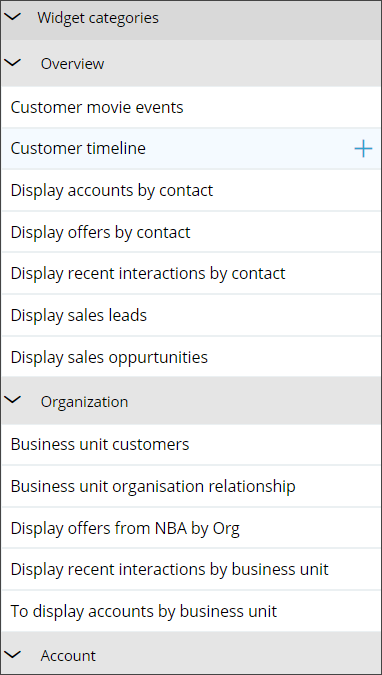
    The Add window displays the available widgets. The following figure shows the widgets for the default template for the Pega Customer Service application. The widgets vary for industry versions of the Pega Customer Serviceapplications.

    Widgets organized by category
    Shows a list of the widgets organized by category
  9. Hover over the widget that you want to add, and then click the Add icon to the right of the widget name.
  10. Add additional widgets if required.
  11. Close the Add window.
  12. Close the Composite section widgets holder window.
For example:

The following video demonstrates how to configure content for customer composite tabs:

Tags

Pega Customer Service 8.7 Pega Customer Service for Communications 8.7 Pega Customer Service for Financial Services 8.7 Pega Customer Service for Healthcare 8.7 Pega Customer Service for Insurance 8.7

Have a question? Get answers now.

Visit the Support Center to ask questions, engage in discussions, share ideas, and help others.

Did you find this content helpful?

Want to help us improve this content?

We'd prefer it if you saw us at our best.

Pega.com is not optimized for Internet Explorer. For the optimal experience, please use:

Close Deprecation Notice
Contact us