Configuring a signature request to DocuSign
Improve customer experience, speed up case processing, and save money by implementing the DocuSign eSignature services as part of your case type definition.
You request digital signatures from Pega Platform through a dedicated Send via DocuSign V2 SmartShape. At run time, the SmartShape performs performs a series of activities, in the following order:
- Collecting the documents attached to the case.
- Packaging the documents in an envelope.
- Distributing the envelope to all recipients by using the DocuSign eSignature API.
Send via DocuSign V2 is a flow-based SmartShape that enables both basic and OAuth 2.0 authentication methods and supports such dynamic behavior like prompting the sender to acquire the OAuth 2.0 token during case processing, if not already acquired.
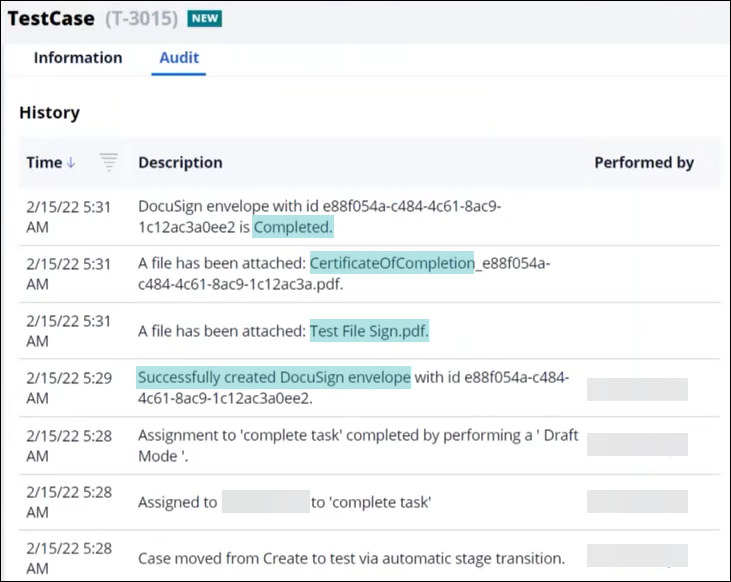
In addition, the smartshape facilitates status tracking for your envelopes by publishing entries in the case audit trail as the envelope advances through its life cycle. The following figure shows a sample set of event notifications that are related to DocuSign envelopes:

- Find and open the case type that you want to integrate with the DocuSign
services or create a new case type.For more information, see Creating a top-level case type.
- On the case type Workflow tab, in the stage that represents a point in the case life cycle in which you need to obtain a digital signature, click STEP.
- From the context menu, select .
- Optional: To change the SmartShape name, in the text box, edit the default value.
- Drag the SmartShape to the intended location within the stage.
- In the Step pane, in the Envelope Page
Name field, specify the top-level data page that provides the
payload for DocuSign eSignature API requests:
- To invoke the pyPrepareNewEnvelope data transform and create a default page to capture the payload, leave the Envelope page name field is empty.
- To skip invoking the pyPrepareNewEnvelope data transform and use an existing page as the payload source, enter the page name in the Envelope Page Name field.
- To invoke the pyPrepareNewEnvelope data transform and create a new page with a custom name to capture the payload, enter the name of the new page in the Envelope Page Name field.
- Confirm your settings by clicking Save.
Previous topic Configuring advanced identity verification for envelope recipients Next topic Additional configuration options for DocuSign integrations

