Configuring email treatments
Configure an email treatment to represent the message that you want to communicate to qualified customers through the email channel. Messages typically consist of images, HTML fragments, and text.
You can define email treatments as internal or external:
- Internal email treatments
- For internal treatments, you configure the content of the message in Pega Customer Decision Hub, including the subject line. Then Pega Customer Decision Hub initiates the sending of the message by using the email account information configured in Pega Customer Decision Hub.
- External email treatments
- External email treatments are pointers to DB/File output templates. Output templates create the DB table content or File for a third-party system to consume. You configure the message content in the external system.
Internal email treatments
Create internal email treatments when you want to define the content of the message in Pega Customer Decision Hub.
There are two ways to design an internal email treatment:
- By using the Customer Decision Hub portal, in an email treatment using
either of the following edit modes:
- Templated Email, which provides you with several easy-to-use templates for designing appealing emails. This is also the default mode.
- Simple Rich Text Editor, which provides a blank page with a rich text editor, which allows you to manually compose email.
- By using external software. Externally designed email content can then be imported directly into an email treatment in HTML format using the Source only edit mode.
Creating an internal email treatment
Create an internal email treatment inside Pega Customer Decision Hub.
- On the Treatments landing page, click .
- Enter a title or a short description for the Treatment.
- Use the Issue drop-down list and the Group drop-down list to select an issue and a group for the treatment.
- Click Create and open.
- In the Subject field, enter the subject of the email
that will be delivered to the customer.
- In the Key Code field, enter the value that identifies this treatment as defined in a campaign brief or other external marketing system.
- Optional: To prevent automatic capture of email opens (impressions) in the
Interaction History, disable the Track
email open rate checkbox.This setting is enabled by default.
- Click Edit mode and select one of the available edit modes: Templated Email, Simple Rich Text Editor, or Source Only.
- Continue to design the email in one of the three edit modes.
For more information, see Designing an email treatment using Templated Email or Simple Rich Text Editor or Source Only.
- Click Save.If the default list of fields available on the email treatment form does not contain a property that you require, see Managing Decision Data rules in Pega Customer Decision Hub.
Designing an email treatment using Templated Email
Use the Templated Email edit mode, which consists of several easy-to-use templates, to design appealing email. Templated Email mode is the default email treatment editing mode.
In Templated Email mode, the system displays a preview area on the left, and an editor pane on the right.- In an email treatment, click Edit mode and select Templated Email.
- Click Pick email template or Load template from file, and then select the email template that you want to use.
- In the preview area on the left, select a region to modify the offer content, for example, click the Preheader.
- Edit the content of the selected area in the editor pane on the right.
- Repeat steps 3 and 4 for all the areas in the email template.
- Click Save.
Designing an email treatment using Simple Rich Text Editor
Use the Simple Rich Text Editor edit mode, which consists of a blank page with a rich text editor, to manually compose an email.
- In an email treatment, click Edit mode and select Simple Rich Text Editor.
- Design your email using the Simple Rich Text Editor.
- Click Save.
Designing an email treatment using Source Only
Use the Source Only editor mode to transfer the design of an email treatment created in external software back to Pega Customer Decision Hub.
- In an email treatment, click Edit mode and select Source Only.
- Import (copy and paste) your externally designed email treatment, in HTML format, into Pega Customer Decision Hub.
- Click Save.
Personalizing email content in Simple Rich Text Editor
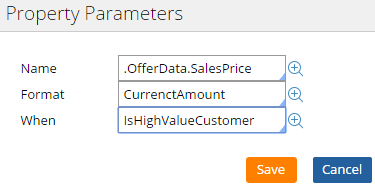
The Insert Property button allows you to add dynamic placeholders to personalize the email with customer or action properties:
![]()
Upon clicking the Insert Property button, the Property Parameters dialog can be configured to embed the necessary data field. For example, the property .Customer.FullName can be added as a placeholder. The customer’s real first name will replace the placeholder at the time of email delivery.
In addition to specifying the name of the field to be embedded, you can also specify:
- Format
- Reference to a Format rule that determines how this field should be formatted.
- When
- Reference to a When rule that determines whether this field should be displayed or not.
Personalization rules for externally designed email content
Use Pega:reference markup rules to personalize an externally designed email in Pega Customer Decision Hub.
The syntax to reference the relevant data is <pega:reference name.[name of the
relevant data]></pega:reference>.
For example, you can reference Customer.FullName data by using the following syntax:
<pega:reference
                name=".Customer.FullName"></pega:reference>
The syntax is then replaced with the relevant data inside the email treatment sent to the customer.
The following list contains the most frequently used property references:
<pega:reference name=".Customer.FullName"></pega:reference><pega:reference name=".Customer.AddressLine2"></pega:reference><pega:reference name=".OfferData.pyName"></pega:reference><pega:reference name=".OfferData.ImageURL"></pega:reference><pega:reference name=".OfferData.BundleName"></pega:reference><pega:reference name=".OfferData.BundleParent"></pega:reference>
Response link embeds
Embed a response link and configure the response mechanism for an email treatment.
You use the Insert Button icon to embed the response links.
- Accept action
- This option embeds a link for the customer to accept the action. You must select whether to direct the customer to a response screen or to an external URL.
- Decline action
- This option embeds a link for the customer to decline the action. You must select whether to direct the customer to a response screen or to an external URL.
- Open internal page
This option embeds a link to launch an internal page. You must specify the name of the response screen (internal page).
- Open external URL
- This option embeds a link to launch an external URL. You must specify the external URL to open.
- Microsite
- This option embeds a link to launch a microsite. You must select the microsite from a list of all microsites that are available in the system.
Configure the response link with the remaining options.
Tracking click rate
The Track click rate option allows you to choose whether to automatically track clicks in Interaction History for any response links that you generate. This setting is active by default.
Redirecting to a Response screen
The Redirect to a response screen option is available for the Accept action, Decline action, and Open internal page links. You can configure a response screen to be displayed when the customer clicks on a response link in the action email. This response screen is an internal page in the application that you configure by using a section. The following options are available:
- For Accept action and Decline action, the default value of the response screen is the value that the application administrator configures. In such a case, a typical response screen represents a confirmation for the action that customers takes (accept or decline) and any other information to present.
- For Open internal page, you can use the response screen as a page to provide more information on the action. This page can contain appropriately configured action buttons (such as Accept and Decline) that customers can use to respond to the action.
If you do not set the value for the response screen, the systems uses the out-of-the-box default response screen, DefaultEmailResponse. Both customer and action data are available for reference when you build and configure a custom response screen.
Redirecting to an External URL
The Redirect to an External URL option is available for the Accept action, Decline action, and Open External URL links. You can choose whether to include relevant offer data during redirection to the external URL. If you select Redirect to an External URL, the system passes the offer data as URL parameters to the external URL. The following list describes the URL parameters:
- C
- Customer ID
- R
- Customer response
- I
- Issue of the action
- G
- Group of the action
- O
- Name of the action
- T
- Name of the email treatment
- W
- ID of the Campaign Runs that initiated the action
- RA
- Rank of the action in the Campaign Run (batch output) table
- OU
- Name of the Campaign Run (batch output) class that contains the action instance
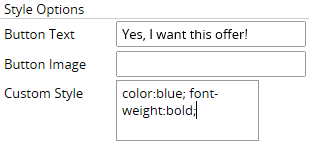
Style options for response links
You can define the following style options for the response link:
- Button text
- The text that is displayed to customers as the link.
- Button image URL
- The reference to an image that is displayed alongside the link.
- Custom style
- The CSS formatting style that applies to the link.
Previewing Included Sections
The Show the preview of included section checkbox (at the bottom of the Email Treatment editor) enables users to preview sections inline in the editor.
Testing the Email Treatment
The Test Message tab on the Email Treatment allows you to test the Email Treatment when it is actually delivered.
The following options are available for configuring the test message:
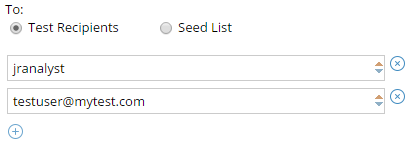
- To – Recipients of the test email. Select either Test Recipients or
Seed List.
- Test Recipients - Enter list of recipients. Each entry can
either be the Operator ID of an existing user in the system or a valid email address. If
the operator ID is entered, operator information such as the name and email is populated
as the customer data and the test email is sent to the operator’s email address.
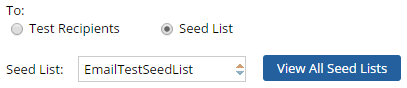
- Seed List - Select a predefined Seed List as the intended
recipients of the test email. The data for each seed is populated as the customer data
and is visible (if referenced) in the test email. In this case, the Email
1 column in the Seed List (.pyEmail1 property) specifies the email address
to which the test email is sent. Refer to the Seed Lists chapter for information on
configuring a Seed List.
- Test Recipients - Enter list of recipients. Each entry can
either be the Operator ID of an existing user in the system or a valid email address. If
the operator ID is entered, operator information such as the name and email is populated
as the customer data and the test email is sent to the operator’s email address.
- Subject – Enter the subject for test email.

- Test Account Settings – Specify Email Account settings for the test
email.
- Use Default Email Account - Select this option to use the
Default outbound Email Account.

- Specify Email Account - Select this option to specify the
outbound Email Account to use for delivering the test email. Specify the account name in
the Account field.

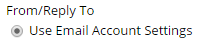
- From/Reply To: Use Email Account
Settings - Select this option to use the sender’s name and reply-to
address that is configured on the Email Account being used.
- From/Reply To: Use Operator Settings - Select this option to use the name and email address of the current operator for these values.
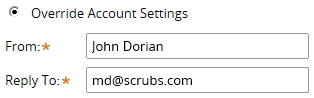
- From/Reply To: Override Account Settings
- Select this option to specify the sender’s name and reply-to address for the test
email. Specify these values in the From and Reply
To fields.
- Use Default Email Account - Select this option to use the
Default outbound Email Account.
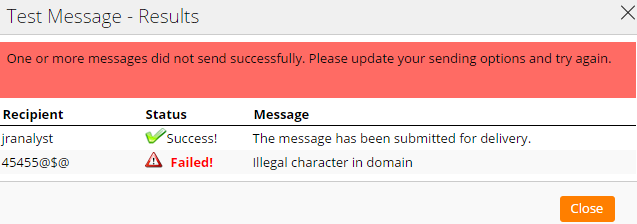
After the test message has been configured, it can be sent via the Send Test Message button.
Upon clicking this button, the Email Treatment is saved and the test email is sent to the specified recipients. The status of the test is displayed.

Any errors in the test delivery are displayed in case of a failure. These can be corrected and the test email can be resubmitted for delivery.
External email treatments
Create external email treatments in Pega Customer Decision HubPega Customer Decision Hub when you want to create the message in a third-party system. You map external email treatments to a File/DB output templates, which create the content for the third-party system to consume.
Creating a file for an external email treatment
Create a file for an external email treatment in Pega Customer Decision Hub.
- On the Treatments landing page, click .
- Enter a title or a short description for the email treatment.
- Select an issue and a group for the treatment.
- Click Create and open.
- In the Repository name field, enter the name of an
existing repository or create a new repository.
- In the File path field, enter the file name.
- Optional: To ensure that all data in the file is the result of a single run, select the Finalize template at the end of each outbound run checkbox.
- Optional: To ensure that all data in the file include a finalization data-time in file
name, select the Include finalization date-time in file
name checkbox.By default, this setting is active.
- Select the delimiter type and the delimiter.
- Click Save.
Creating a Database template for an external email treatment
Create a Database template for an external email treatment in Pega Customer Decision Hub.
- On the Treatments landing page, click .
- Enter a title or a short description for the treatment.
- Select an issue and a group for the treatment.
- In the Context field, enter the platform for the treatment.
- Click Create and open.
- In the Database field, enter a name for the external database.
- In the Table field, enter the name of the database.
- Optional: To ensure that all data in the file is the result of a single run, select the Finalize template at the end of each outbound run checkbox .
- In the Writing option section, select a condition for
the template data:
- Overwrite existing data
- Append to existing data
- Click Save.
Bundled email treatments
When you design Email Treatments for bundles, consider the type of bundle. A typical Email Treatment for an action bundle includes an overall description of the bundle and details for each of its members. Additionally, based on the bundle type, response links can be provided at either or both the bundle and member level.
The top level BundleTemplate Email Treatment is provided as an out-of-the-box sample. The following figure shows a template email for sending a bundle of offers:

The BundleTemplate treatment includes the following parts of a bundle Email Treatment:
- Bundle name - References the .OfferData.BundleName property
- Response link for bundle – Added using the Insert Button functionality
- Impression capture - References the RecordImpression section. With bundles, you typically include the impression capture section at the parent level.
- Member details - References the BundleTemplate section. This section
uses the BundleOfferMembers page list property to display the member
actions in a grid with accept and reject response links for each member.
BundleTemplate 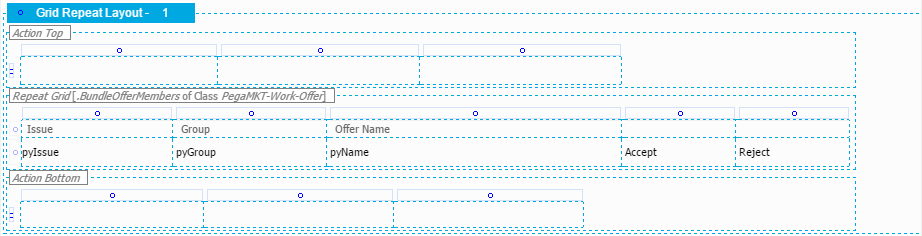
The BundleOfferMembers property is populated at runtime to contain details of the various bundle members. This can be used in dynamic containers such as the repeating grid. You can also make static references to member actions in this page list. For example, to display the name of the first action in the bundle, you reference the .BundleOfferMembers(1).OfferData.pyName property.
Another common usage pattern is to update the grid in the BundleTemplate (or equivalent) section at the top level, which is PegaMKT-Work-Offer, to include a sub-section for displaying relevant action information. For example, MemberOfferDetails. You can then create a top-level version of this section to serve as a base for all member actions. To customize the details for a particular issue or group, you must override the details section in the appropriate issue or group class.
Identifying customers who open or respond to email treatments
Identity matching occurs when users open and respond to marketing emails sent through the application.
The following associations are captured when a customer opens a marketing email:
- CustomerID to UniqueID
- CustomerID to Email Address
- CustomerID to IP Address
- UniqueID to Email Address
- UniqueID to IP Address
The following associations are captured when a user clicks on a response link in a marketing email:
- CustomerID to UniqueID
- CustomerID to IP Address
- UniqueID to IP Address
Previous topic Defining eligibility conditions for treatments Next topic Configuring SMS treatments